YouTube make a quail feeder. Do-it-yourself quail feeders according to the instructions
All beginner poultry farmers are faced with the problem of feeding their pets. Quail is no exception. Beginners in this area will decide what to feed and, no less important, what to feed the birds with. Next, we will talk about how to make quail feeders with your own hands, what types they are divided into and what material to use for making.
Good feeders and drinkers can be made independently
It takes a lot of money to purchase feeds, especially since birds scatter them during meals. But a well-organized diet and selection of feeders in accordance with the age of the quail living in the cage will reduce feed costs and keep the cage clean for longer. That is why it is important that the feeder is comfortable enough for both birds and their owners.
Important criteria for a good feeder:
- material. It is important that it is hygienic. It is recommended to make the cage from stainless steel, glass or plastic. It is necessary that the material does not exude hazardous and toxic substances that adversely affect quail;
- dimensions. In general, the choice of scale is directly related to the number and age of individuals. In addition, the capacity of the feeder should exceed the amount of food consumed by the birds;
- design. Pets need a free approach to the "table". And the sides above will not allow the feed to sleep enough for the cage.
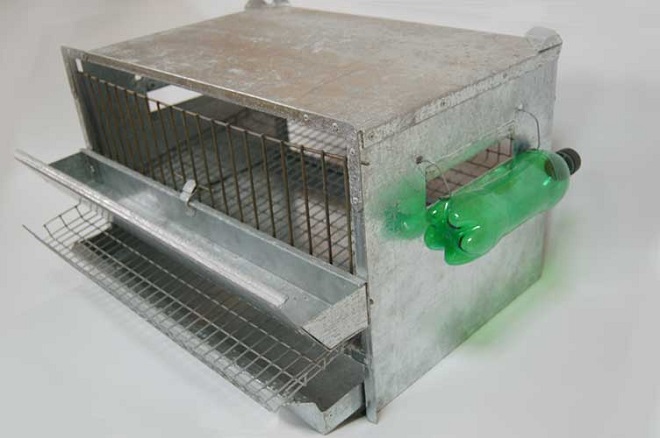
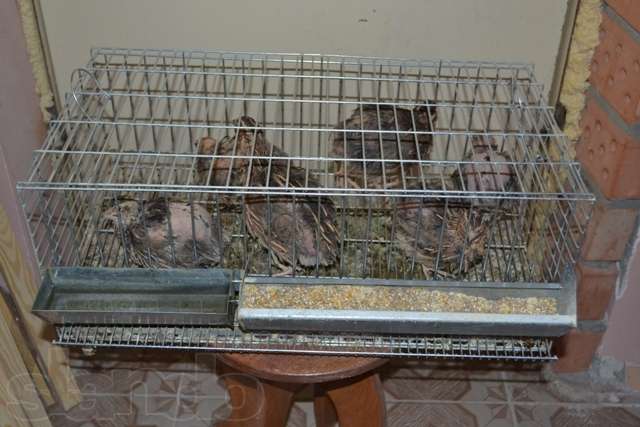
Quail cage with a groove feeder and a homemade plastic bottle drinker
Depending on how the food is served, quail food containers can be divided into several types.
- Tray. Their peculiarity lies in the fact that only one type of feed can be used in them. They are located inside the cage, and chicks eat from them. However, they can be fixed from the outside: in this case, the chicks will not climb into the feeder and scatter the feed. It should also be borne in mind that for each bird there should be from three to five centimeters of space in order to avoid crush and damage to the quail.
- Grooved. They are well suited for young birds as well as for mature ones. Several types of feed can already be poured into them. In the event that you fasten the feeder outside, remember that each quail needs, again, its own three or five centimeters of area for convenient and safe food consumption.
- Hopper. This type is mainly used for feeding adults with dry food. They can be fixed both inside and outside the cell. The feed is placed in the container, and then the pallet. After all this construction is turned over. A bunker quail feeder has several advantages, one of which is the ability to control the amount of feed and the frequency of its addition, as food is poured out of the container during a quail meal.
- Automatic. They are more advanced in relation to bunker feeders. They are distinguished by the presence of a dispenser, a timer, an electric drive and wires for supplying electricity. With the help of such improvements, it is possible to organize bird nutrition for several days in advance, and the owner will not take part in the process at this time. However, the cost of adaptation is quite high, which is why the benefit from it can be obtained by applying it in large farms.
Manufacture
Making any quail feeder is actually not as tricky as it seems. For building material, trimming plywood and polycarbonate sheets that are left over from previous works and have not been used for a long time are suitable.
Made of plastic
![]()
A simple hopper feeder can be made from parts of a plastic bottle and improvised materials
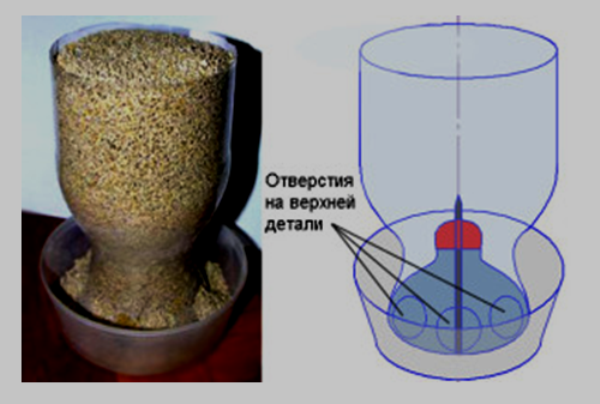
Such a bunker feeder for quails with their own hands is made from two plastic containers, which can be made from a bottle of sparkling water. And also in the manufacturing process you will need a pallet and long screws.
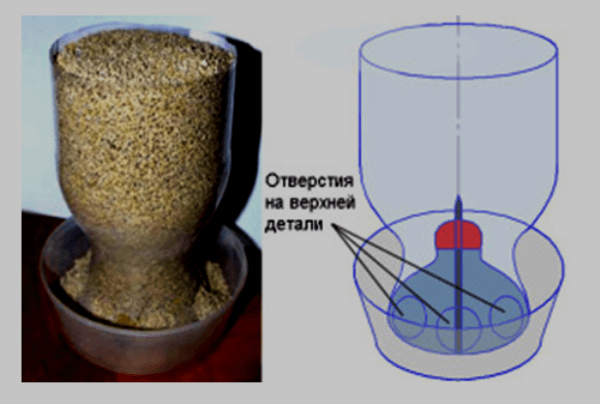
- Bunker. In a plastic bottle at a distance of a decimeter from the neck, it is necessary to drill two holes with a radius of one or two centimeters. Slightly above the holes made cut off the top of the bottle. Turn the resulting product over and insert the inside of the bottle with the neck.
- The whole body. Place the feeder in a prepared pan.
- Fixation. Fasten the feeder in the pan using self-tapping screws or screws. Then you need to pour dry food inside.
This type of quail feeder is not only easy to manufacture, but also very practical, since the food will spill out into the pallet at the moment when the quail is almost pecking the one already inside.
It can also be made from plywood sheets, a section of a profile and screws.
From plywood
- Profile. First, a profile of the desired length is cut out and small bends are made along its edges, on which screws or screws will be attached. Dimensions of the profile depend on the size of the cell and on the number of its inhabitants.
- Side parts. They are made of plywood and in appearance should resemble a women's boot. On the lower edge, the width of these parts and the profile should be the same. After these details are inserted into the profile.
- Front and back part. From the same material, two blanks must be made, the height of which coincides with the upper edges of the details, similar to boots.
- Assembly. After all the parts are ready, the design is fastened with self-tapping screws or screws.
And then a bunker of the required volume is made and screwed onto the resulting product with self-tapping screws.
The scheme of the bunker feeder: the top is the feed tank, the bottom is the feeder itself, the feed enters it through the dispenser as it is consumed
Following this algorithm, making a feeder is easy enough. The finished structure is fixed outside the cage. It works as follows: the feed is filled up to the edge of the bunker, and as the birds eat, it will be added to them in the cage through the slots below.
Also for the manufacture of equipment polycarbonate is excellent.
For products of this kind take almost any type of polycarbonate. However, it is recommended that it be sheet.
Working with raw materials is quite easy, because, in fact, it is plastic. A feeder is made of it according to the algorithm presented above, it is only necessary to take polycarbonate sheets instead of plywood.
Automatic
An improved version of the usual bunker is an automatic quail feeder. It is used, as mentioned above, most often and effectively in large farms.
Buying a factory device in a store can hit your pocketbook a lot. Therefore, if the budget does not allow or there is a desire to create a useful thing for pets yourself, you can do it yourself. True, it is worth saying right away that such work requires at least basic knowledge of physics and skills in electromechanics.
So how are they done?
- Hopper capacity. You can make it from any material.
- "Highlight". The assembled bunker tank must be equipped with a feed dispenser and a time relay.
- Electricity. In order for the design to work, it is necessary to carry out a power supply system.
Quail feeding will be carried out three times a day. The timer is activated, and a portion of feed is poured into the tray. If everything works, then we can assume that the feeder is ready.
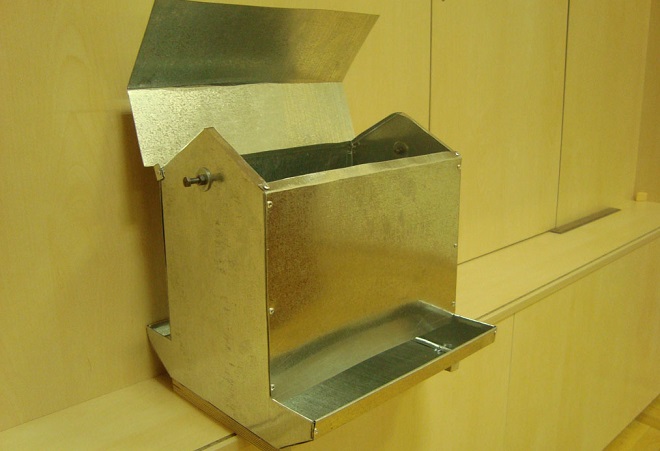
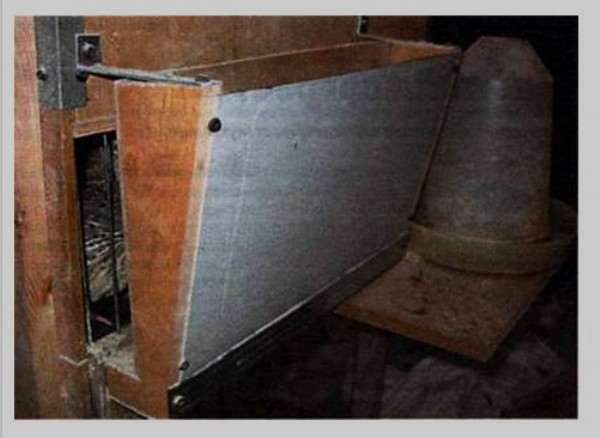
Galvanized metal hopper with double-sided feeder. May be the basis for an automatic feeder
Since the cost of buying food in poultry farming is the largest part of the cost, an auto-feeder will reduce these costs at times. It is logical that saving even ten or fifteen percent is a very tangible reduction in the cost of production of quail eggs and meat.
"Dinnerware
Separately, it is worth talking about "dining" devices intended for quail.
- Firstly, the dishes need a convenient owner to use, the feed trays must be fixed so that they can be easily removed and washed.
- Secondly, the trays are arranged in such a way that each individual has his own space for a meal. It is recommended that for each bird up to eleven millimeters of space along the entire length of the tray.
- Thirdly, security. Feeding devices should be made of safe materials, not cause harm or cause discomfort to birds.
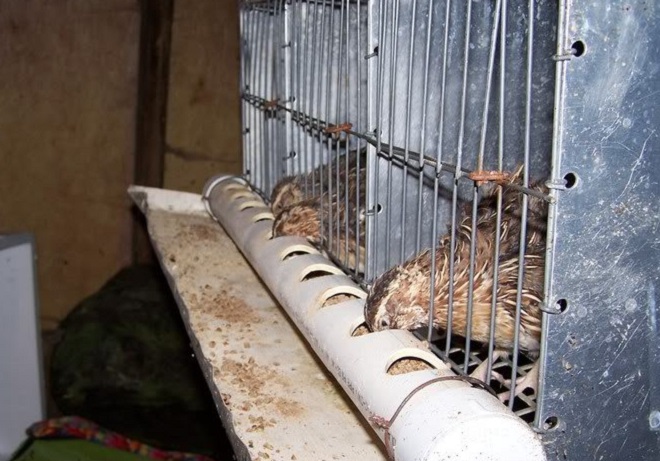
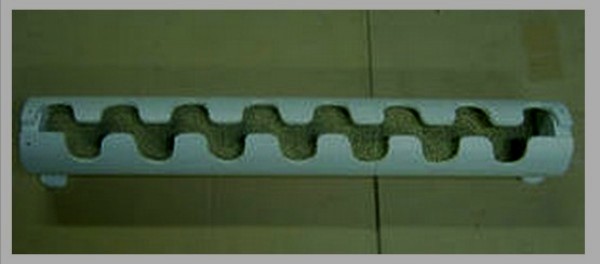
Polycarbonate tube groove feeder - each individual has its own place for a meal
Summary
The choice of feeding trough depends entirely on the situation. It is necessary to approach this with all responsibility so that there is no loss. However, do not be scared in advance. Using your experience in animal husbandry and the prevailing circumstances, you can provide the birds with the most comfortable feeders from improvised materials and avoid the acquisition of expensive models in stores.
A reasonably organized process of drinking and feeding allows one-third to save feed costs, ensuring cleanliness inside the cage. Making devices for feeding and watering birds is only half the battle; you need to ensure that they are comfortable. Here and now we will talk about how to make simple devices for feeding and drinking from waste items.
The choice of methods for making the feeder and drinking bowl depends on a number of factors. But you should always try to make them as convenient as possible, while spending less money. Only then can we expect appropriate returns.
How to make a drinker from a plastic bottle?
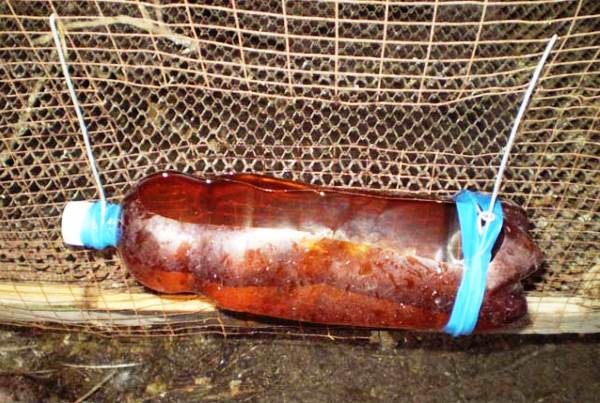
Self-constructed quail drinkers with their own hands can be placed inside the cage, as well as fixed on the outside. The most unpretentious option for a quail drinker will be an open type reservoir made of a plastic bottle, which is cut horizontally and fixed outside the cage.
Quail drinkers must comply with standards. In the manufacture of them exclusively materials are used, not consisting of toxic compounds.
Quail drinkers can be made from ordinary food-grade plastic bottles.
Tools and materials
- Plastic bottle.
- Tin
- Sharp knife.
- Drill.
- Thin wire.
Step-by-step instruction
- We cut off the lid from the can and clean the edges to make them smooth.
- At this capacity we make two holes for fastening at a distance of 6 centimeters from the bottom.
- We attach with screws at the place of distribution of water.
- In a plastic bottle near the neck, we drill several small holes in a circle.
- We fill the bottle with water, twist the cap and insert it upside down in a tin can.
- We fix the bottle with wire. We wrap the drinker with it in two places and attach it to the support.
Everything, the simplest quail drinker is ready, you can fill it with water, using as intended. This design is presented in the photo above.The water level in the bottom will not change, because the flow of water for drinking will be compensated by the flow of fluid through the hole.
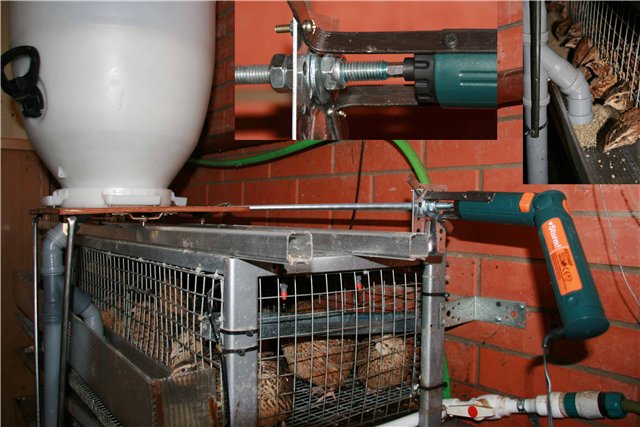
How to make a nipple drinker?
Quail nipple drinkers have gained wide popularity because, thanks to them, water is saved, the purity of the cells is maintained and they work like an auto-drinker. Such a construction can also be done with one's own hand.

Tools and materials
- nipple;
- teflon tape;
- phillips screwdriver
- electric drill with a drill diameter of 9 mm;
- water tank;
- rubber or plastic hose;
- plastic pipe 1 meter long;
- plug for pipe;
- drip catcher.
The video below details in what order the nipple device for drinking should be mounted.
Step-by-step instruction
- We take the pipe and mark with chalk those places where we will insert the nipples.
- We drill 3-4 holes in the designated places, after about 30 centimeters each.
- In the drilled holes we cut the thread.
- We screw in the nipples.
- Wrap them with teflon tape to avoid fluid leakage.
- We close one end of the pipe with a plug.
- We put a hose on the other end of the pipe, which is connected to the tank with water.
- For convenience we install drop catchers.
- We fix the pipe with nipples, install a tank of water and begin to water the birds.
How to make a bunker feeder?
Making a feeding trough is not as difficult as it might seem. The farm always has some kind of scraps, improvised things that can be applied in practice. Most often, they try to make bunker devices for feeding from wood, plywood or stainless steel. And floor-mounted feeders can be made of plastic. It is such a feeding trough made of two plastic bottles that we will craft.
Tools and materials
- Plastic bottle.
- Tray or bowl.
- Sharp knife.
- Electric drill.
- Self-tapping screws.
Step-by-step instruction
- In a plastic bottle on top, at a distance of 10 cm from the throat, we drill holes with a diameter of 20 millimeters.
- Slightly above these holes we cut off the upper part of the bottle, and we also cut off the bottom of it.
- We turn it over and insert the cut-off part of the bottle with the cap into the structure.
- The structure is placed in a pallet, motionlessly fixed with screws through the cover, as indicated in the drawing.
- Pour food on top - the feeder is ready for use for its intended purpose.
This method is easy to manufacture and very practical, because the food will wake up in the pan as it is eaten from the feeder.
Photo gallery
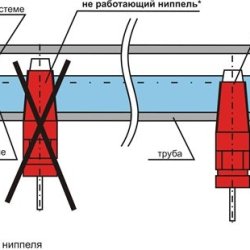 Photo 1. Scheme of the correct installation of the nipple
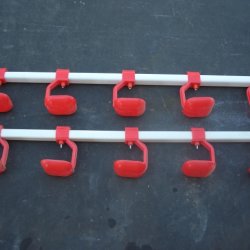 Photo 2. Two details of the nipple design
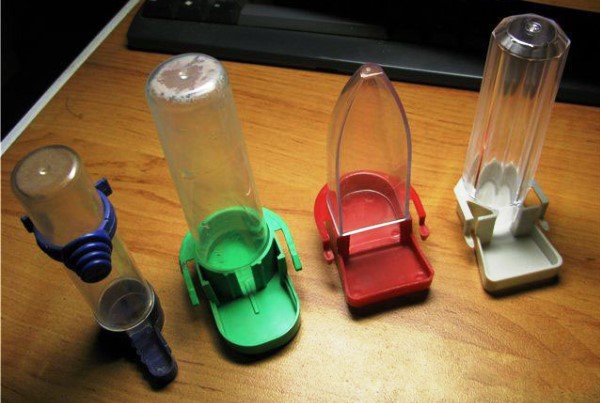
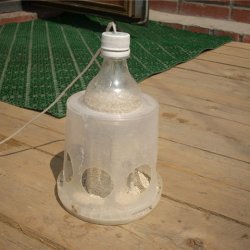 Photo 3. Option bottle feeders
Video "Bunker bird feeder with your own hands in 10 minutes"
In this video, a skilled poultryman talks about how he makes a bunker feeder for birds in a very short time. By carefully watching the video you will understand how simple it is.
Quail feeders are now produced by many manufacturers. In use, industrial designs are quite convenient. But if desired, the farmer involved in the breeding of this bird can make feeders on their own. At the same time, it is allowed to use improvised materials. With the right approach to business, a self-made feeder will turn out to be no less convenient than a store one.
Basic design requirements
As you know, quail - birds in terms of feeding are rather messy. They do not peck part of the food, but simply scatter it on the floor. As a result, unsanitary conditions are created in the cells even with periodic cleanings. And this, in turn, can lead to the development of infectious diseases and to the mortality of birds. A quality feeder will help to avoid scattering.
The requirements for such structures with the content of quail are as follows:
the feeder should be made of hygienic, easy-care material;
the design of the feeder should include elements that prevent the droppings from getting into the feed;
eating from a bird feeder should be convenient.
Tin and plastic quail feeders are made at factories. These materials are considered the most hygienic.
What should be the dimensions: general requirements
Ideally, such structures are selected taking into account the age of the bird. The size of the quail feeder should be such that when filling with a one-time food norm, there will still be a little free space in it.
Types of structures
For feeding quails on farms, the following types of feeders are used:
grooved;
tray;
bunker.
Quail feeding troughs are a common trough. The advantage of this design is primarily the ease of manufacture. Groove feeders are convenient to use when keeping birds using the cellular method. This option is attached directly to the rack. Bunker feeders, like tray feeders, are used for floor or aviary content of quail. The main advantage of such designs is the ability to reduce the frequency of laying the feed. Bunker feeders are well suited to those homeowners who do not come out of town every day.
How to make a tray feeder
All the above-described varieties of designs, if desired, can be made including with your own hands. Quail feeders for quail, for example, are often made from ordinary sewer plastic pipes. In the latter, a trough of such a width is first cut through the entire length so that feed can be conveniently poured into it. The bird itself should not crawl into it.
Further, several through holes (on both sides) are made along the length of the gutter. Their diameter should be such that the bird can freely stick its head in them. Through these holes the quail will subsequently peck the offered food. At the final stage, “legs” are attached to such a feeder from the bottom (you can simply attach from both ends of the pipe across the bar).
The dimensions of the do-it-yourself feeder for quail trays made by yourself should be such that the width of the bottom and the height of the sides correspond at least 2: 1. The length of this design can be any.
How to make a groove design
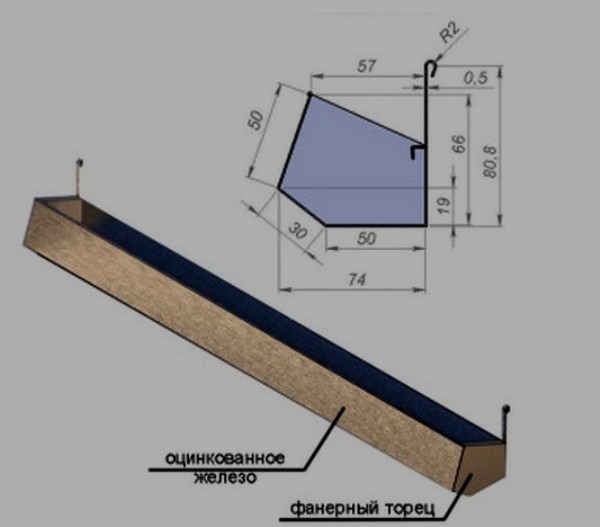
Such mounted quail feeders are usually made of tin with a thickness of 0.5 mm. A box with a bottom width of 50 mm and about the same height as the farthest from the cage is bent from this material. The middle one needs to be made lower. To prevent feed from entering the cell at the edge of this rim, a slight limb should be performed.
How to make a bunker feeder for quails with your own hands
Such constructions are usually made of plastic bottles on their own. For one feeder, you need two such containers - 2 and 3 liters. The bottom is cut off from the larger bottle so that the sides of the resulting “cup” are about 5 cm high. The neck is cut off from the two-liter bottle (without removing the cap), 2-3 cm away from the narrowing point. The rest of the bottle is turned over and put on a smaller . Previously, holes of small diameter are cut in it along the edge.
The design obtained from a two-liter bottle is installed in a “cup” cut out at the first stage. Then grain is poured into it.
Quail diet
The use of high-quality convenient feeders can significantly reduce labor costs for the maintenance of poultry. However, success in breeding quail will largely depend, of course, nevertheless on compliance with the rules for caring for them. And first of all, the farmer, of course, should develop the right diet for the bird.
It is believed that the best quail rush and gain weight if their menu consists of a third of protein products. These include, for example, cottage cheese, fish, minced meat, earthworms. Also, birds must receive concentrates. It can be wheat, peas, barley, corn, bran.
Of course, quail and greens should be given. This bird eats very well, for example, dandelions, cabbage, potatoes, carrots, etc.
In the first stages, quail chicks are fed a grain mixture (millet, barley and corn crushed), seasoned with a small amount of vegetable oil and salt.
Growing quails: room requirements
Like almost any other wild bird, quail are very susceptible to stress. They are also quite sensitive to environmental conditions. Therefore, special requirements are imposed on the quail room. The house for this living creature should first of all be well ventilated. Without fresh air, the body of quail will not absorb feed.
In no case should there be a draft in the room for this bird. Otherwise, the quail will surely catch a cold and may die. This bird also does not tolerate too bright light. When arranging a room for her to the farmer, this must be taken into account.
Bird cages need to be installed deep in the barn. The fact is that the quail is very shy. And any sudden movement outside the window can cause them stress. And this, in turn, will lead to a decrease in egg production.
Quail cultivation will be successful if in winter the indoor air temperature does not drop below +16 C. The optimal indicators for this bird are 18-20 C.
Of course, in no case should dogs or cats visit the barn. Restrict access to this room and strangers. Such requirements are explained, first of all, by the same timidity of these birds.
What should be the cells
The floor method of quail contain quite rarely. More often this bird is grown in cages. At the same time, the latter, as well as the room itself, have certain requirements. Of course, the cell size of the cell must be selected in accordance with the age of the bird. Chicks should not fall out on the floor, of course. The density of landing with such a dilution should be equal to about 14 dm 2 per 10 individuals.
Egg incubation
Of course, many farmers containing quail would like to breed this bird in their household. This is not as complicated as it might seem at first glance. Hatchability in these birds is approximately 70%. It is believed that to obtain an incubation egg, it is rational to maintain a separate parent livestock. In this case, it is advisable to select breeding males from another herd. Quail - birds, unfortunately, are very sensitive to imbreeding.
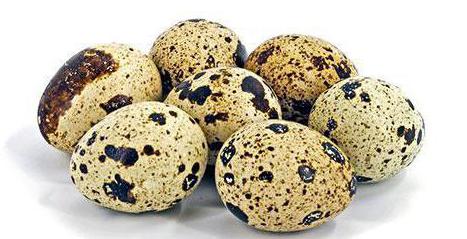
The optimal weight of the hatching egg itself is 9-16 grams, depending on the breed. During the selection, the shell should also be examined. It should not have any calcareous growths. The color of the shell should not be very dark. Irregularly shaped eggs are not suitable for incubation.
Quail eggs intended for hatching are kept at a temperature of 18 ° C. They cannot be kept for more than a week before laying. In the first three days, the temperature in the incubator is set at 37.5-38.5 о С. From the fourth to the fifteenth day this indicator is slightly reduced. The temperature in the incubator during this period should not exceed 38 ° C. Turn over from 4 to 15 days at least 6 times a day. Also, the device cover will need to be opened for short periods of time for ventilation.
From the 16th day, the temperature regime is set at 37.5 o C. The humidity of the air inside the incubator by the time of hatching of the chicks (on day 17) should not be less than 90%.
Drinking regimen for quail is very important
Successful breeding of quail at home requires certain conditions for life. Proper organization of the water regime and nutrition will save money on feed, will become a guarantee of cleanliness in the nursery and increase the productivity of the bird.
Quail feeders and drinking bowls can be purchased at a specialized store or built with your own hands.
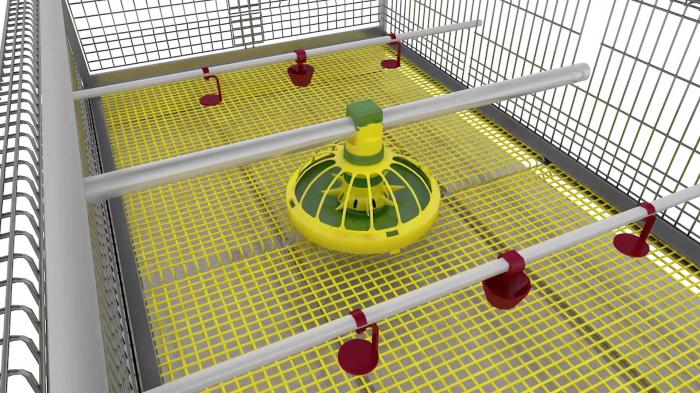
Ready equipment for the cage
Drinker Requirements
The watering system installed in the bird cage must meet quality standards. Quail drinkers should be environmentally friendly and easy to use. The design with free access and water supply will be practical for both birds and poultry farmers.
Equipping drinkers for quails with your own hands, think through everything to the smallest detail. Drinking bowls must be protected from foreign objects, including bird droppings, getting into the water. For this, the design is equipped with a special protective device.
The durability and compactness of the system will provide it with a long service life, which is important for the owner.
Types of drinking systems
One of the simplest and most affordable constructions for this purpose is an open watering system. For this, an open container of water is installed in the cage. This system has many drawbacks, so it is rarely used.
Birds often turn over drinking bowls, they get food, litter and other garbage. Therefore, the poultry farmer often has to clean the drinker and fill it with fresh water. In a deep open container, birds can even drown.
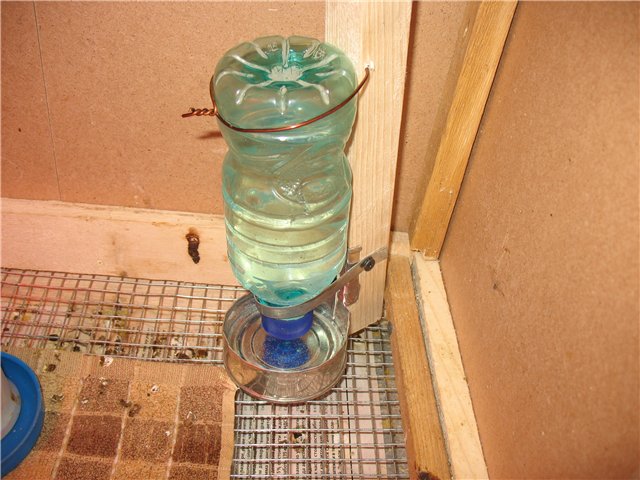
Vacuum drinkers are easy to use.
Vacuum drinking bowl - a successful design, which is used in large poultry farms. The principle of operation of such a system is based on the difference in atmospheric pressure inside and outside the tank.
Cup drinking is an easy option. The water supply process in this design is carried out under the influence of a bowl filled with water. As emptying the microcup drinking bowl is filled with liquid from a special barrel. The filled bowl is heavier, due to this, the process of supplying water from the tank is stopped.
Plastic pipe cup drinkers
Automatic system. This design is often used in professional poultry factories. It is fully automated and works without human intervention. The only thing that is required of the poultry farmer is to check the presence of water in the tank and timely identify the facts of malfunctions and breakdowns.
This is the best option, which is convenient for the owner and for the birds.
Nipple or drip watering systems. According to the nipple principle, washstands work in trains or in summer cottages. When the nipple is pressed, water is supplied. This system has advantages - saving water, keeping the nursery clean and continuously supplying birds with clean drinking. Therefore, nipple drinkers are popular and in demand.
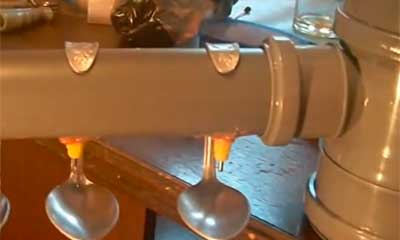
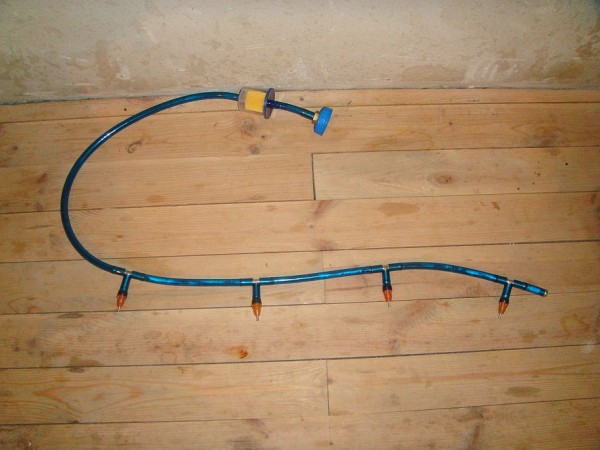
Nipple drinker made of pipe, nipples and spoons
In addition, using such a drinking system, the flow of water is controlled, and this makes the process of growing quails profitable and economical.
DIY nipple watering system
If desired, this design can be done by yourself. And for this, drawings are not required. To build such a system, a plastic pipe is required with a plug on one side and a nipple. The number of the last elements is determined by the length of the cup and the distance of their fastening. The optimal distance between the nipples is thirty centimeters.
Homemade hose nipple system
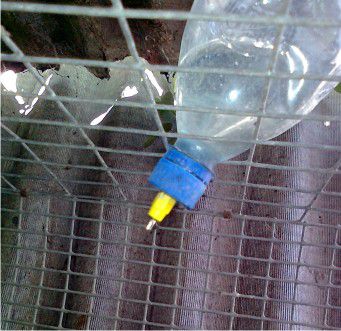
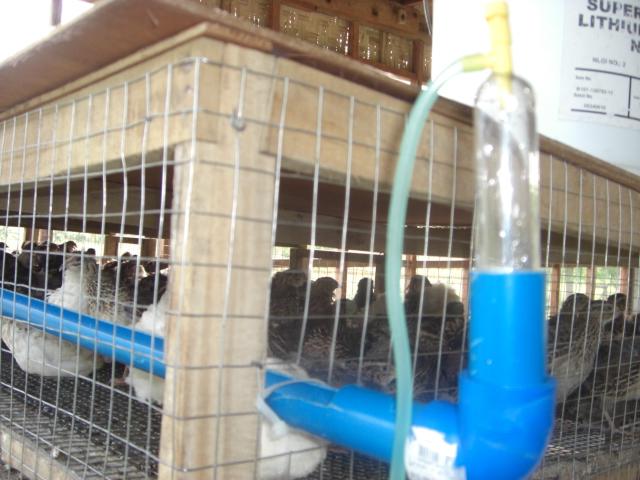
Nipple system from a regular bottle
Scheme of work:
- Chalk marks are made on the pipe at the same distance.
- Then, holes are drilled in these places with a drill.
- A thread is cut in each hole and a nipple is screwed in.
- To eliminate the risk of water leakage, each hole is wrapped with a special tape.
- A plug will be installed on one side of the system, and the other is connected to a container of water.
The success of such a system depends on the installation height of the tank. The higher the capacity is installed, the better the system will work.
Feeder Requirements
Before starting quail breeding, it is necessary to provide them with the correct feeding system. These birds are very fond of scattering food, which causes not only great losses financially, but also creates dirt in the nursery. Ideally, quail feeders should be selected according to their age.
The volume of the feeding system should be greater than the volume of feed that is fed to the birds. Any design should be convenient for both birds and poultry farmers.
Quail food should be constantly
Regardless of the model, the feeder should be equipped with a protective system to prevent debris, litter and water from entering. Eco-friendly, durable design for feeding will ensure the safety of pets and will last a long time.
Types of feeders
Special trays that are installed for recently hatched offspring. This system is used exclusively for one type of feed.
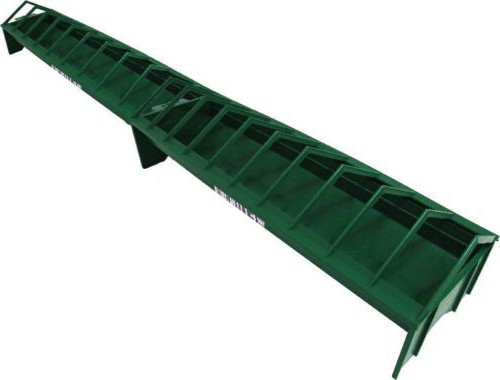
Groove feeders. They are used to feed young and adult birds. They are attached from the outside of the nursery, which provides access to feed only on one side. Groove systems are used to fill with different feeds.
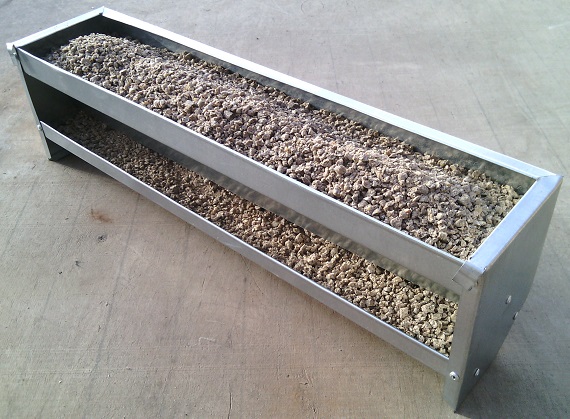
Metal trough
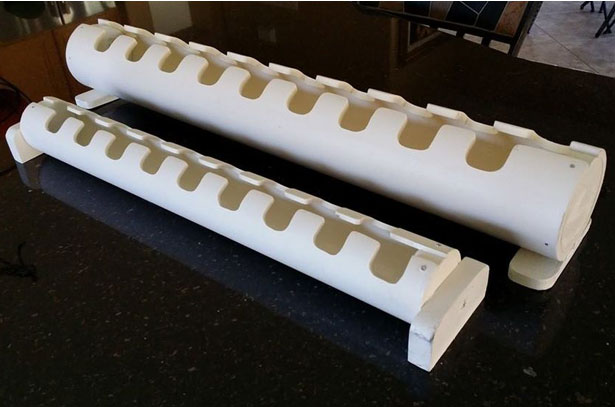
Plastic pipe feeder
Bunker systems are used for feeding birds with dry mixes. The bunker quail feeder is designed for adults and is installed on the outside of the cage.
A more modern version of the previous model is the automatic design, which is equipped with a dispenser and a timer. These devices provide a dosed feed at regular intervals. This model is often used in large farms, because it is expensive and does not pay off immediately.
Automatic feeding system
All of the above quail feeders with their own hands can be done easily and simply according to the drawings. This will save money on the purchase of finished products.
Modern manufacturers began to produce a special design - a brooder for quail and other poultry. This room is equipped with all the necessary birds for life, systems - drinking, feeding, lighting and heating.
DIY brooder
You can make a quail brooder from any improvised devices - a cardboard box, a parcel plywood box, etc. This is one of the simplest solutions, which, but it will not provide the young chicks with the proper conditions of heat, lighting.
Bruder Requirements
- Strength.
- The presence of heating and lighting.
- The ability to maintain cleanliness and hygiene in the room.
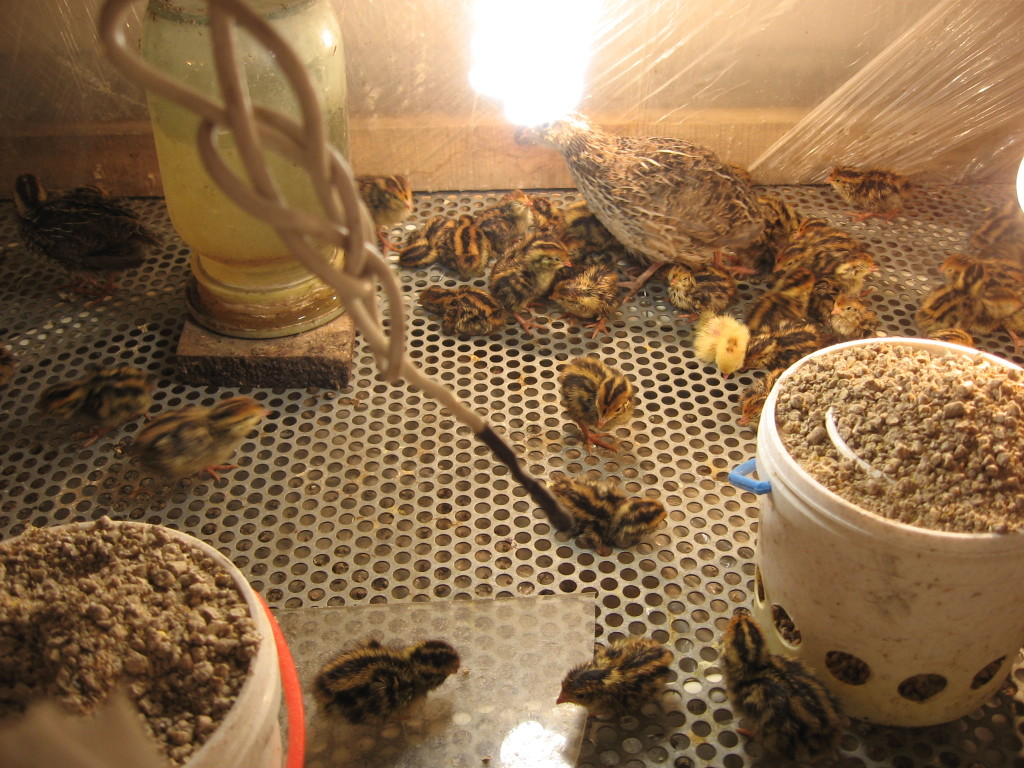
Quail in a brooder with a feeder and a drinking bowl
The most durable and solid is the quail brooder, made of wooden beams and plywood sheets.
For convenience, the bottom in this design is made of a removable mesh. IR lamps provide the necessary lighting. To adjust the heat as the chicks grow, you will need a thermostat. As a litter broader, you can use any sheet of metal or plastic that is easy to clean and wash.
Step-by-step instruction
First, a frame of four bars is made. Planks are connected by self-tapping screws. Then they are sheathed with plywood sheets. The top trim of the walls and bars should match as much as possible.
When the back wall and the two side parts are ready, you can begin to manufacture the front of the brooder. Hinges are first attached to the front, part of the side elements, then doors made of plywood in size are hung on them, in accordance with the design.
If everything is done correctly, the doors should open and close easily and freely, and the structure should stand straight and without distortions.
The final step will be the installation of a mesh bottom and ceiling. The grid is installed between the slats, fixing with screws.
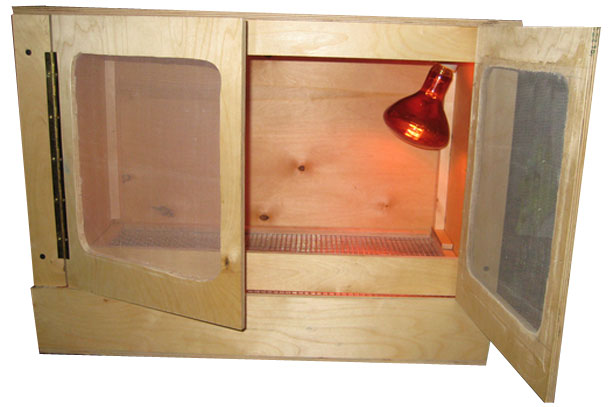
Homemade wood brooder
The system for collecting litter is collected in the same way as the bottom. Only a metal sheet is used instead of a mesh. A plywood strip is installed on the front side of the pallet, which blocks the inlet and prevents the droppings from getting enough sleep.
The height and number of lamp installations in the brooder is determined by the age of the birds.
The lighting fixture is best equipped on the back of the brooder. It is also necessary to provide a place for a thermometer, with which you can monitor and control the temperature in the room.
For many, it seems that a do-it-yourself broiler for quail is very difficult to do. Following the technology described above, this constructive work can be mastered by every poultry breeder without carpentry and engineering skills.
Everyone who has ever been involved in breeding birds, faced with the need to feed them. And quail in this case are no exception. In this article we will tell you what quail feeders are, what they are made of and how to make a do-it-yourself feed adaptation.
The content of quail is a profitable business, but here it is also necessary to be safe and rationally distribute costs. The lion's share of the money goes to purchase feed, which quail often just scatters when feeding. A properly organized drinking diet about feeding can not only save feed costs by 35%, but also ensure cleanliness in the cage. It is important that the feeder and drinker are comfortable, and not only for the birds, but also for their owner.
The main criteria for choosing a quail feeder:
- material: the most hygienic are feeders made of stainless steel, glass, porcelain, plastic; it is necessary that the feeders are cleaned without difficulty, and the material does not emit toxic substances that can adversely affect the health of the bird;
- size: depends on the number and age of the quail, but it is important that the volume of the feeder be larger than the volume of feed that is intended for poultry;
- construction: should guarantee constant easy access to quails to food, as well as to the supply to their owner, but the sides should not be too low so that the feed does not crumble.
Depending on the type of feed, the following types can be distinguished:
- Tray - can be used only for one type of feed. Placed inside the cell; suitable for feeding chicks. This type of feeder can also be attached externally. Then the chicks will not be able to climb into it and scatter food.
- Grooved - used to organize the diet of young animals, as well as adult birds. Mounted from the outside. If you use feeders that are fixed outside the cage, then consider one important fact: the approach to it is one-sided, so each bird should have its own 30-50 mm for approach.
- Bunker quail feeders - used to feed adult quail dry food. They can be attached both from the inside and from the outside of the cage. The design is a container with a pallet. Feed is poured into the tank, a pallet is placed, and then the whole structure is turned over. The main advantages of a bunker feeder for quail is the ability to control the amount of feed and the frequency of its filling, as it gets enough sleep as it is eaten by quails.
- Automatic feeders - an improved and improved version of the traditional bunker feeder for quail. The feeder is distinguished by the presence of a dispenser and a timer. It allows you to organize a feeding diet for several days without the participation of the owner, as it delivers a certain amount of food at a time set by the owner. But such a construction is not cheap, therefore, it can only be used effectively in large farms.
How to make
Designing a homemade feeding trough is not as difficult as it might seem at first glance. There are likely to be some scraps from previous works on the farm that are perfect for our business.
Plastic - bunker
The simplest manufacturing option that even a novice master will cope with is a bunker feeder made of two plastic containers. Make it easy with a plastic bottle, tray and a long self-tapping screw.
- We take a plastic bottle and from above (at a distance of about 8-10 cm down from the neck) we drill holes with a radius of 10 mm.
- Above the holes made, cut off the top of the bottle.
- We turn it over and insert the part of the bottle with the neck that we received in the second stage into our design.
- The structure is placed in a pallet and immobilized with self-tapping screws, as shown in the drawing.
- It remains only to pour food on top.
The bunker feeder is not only easy to manufacture, but also practical, because the feed will enter the pallet as it is eaten by birds.
Groove
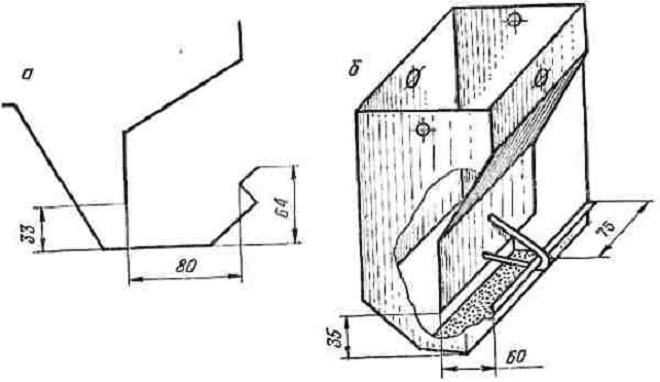
The groove feeder is easy to make on its own from a sheet of galvanized iron.
- We take a sheet of plywood and cut out the sidewalls for the feeder as indicated on the drawing.
- On the blank sheet of galvanized iron with a width of 18, 1 cm, we mark the scan taking into account the length we need.
- We mark the fold lines with a pencil: we retreat from the wide edge of 5 cm, then draw the first line, the second after 3 cm, the third after 5 cm and the fourth 4 cm.
- We bend the sweep along the lines at a right angle, except for the side that will be parallel to the cage - it should have a slight slope for convenient feed feeding.
- To prevent the ingress of feed into the side, we bend the side of the feeder, which will be adjacent to the cage, one and a half centimeters out.
- We insert the sidewalls and arrive at the edging with small carnations.
Also, curved steel strips can be nailed to the ends, with which they will hang the feeder to the cage (see drawing). If you are making a metal trough, do not forget to bend the edges so that the chicks are not injured.
From the pipe - tray
To make a trough feeder, you only need a plastic pipe, a little of your time, as well as perseverance. Just take a piece of pipe of the size we need, and then cut out the pattern in it, as shown in the figure. You can place a grate on top so that the chicks do not climb inside, do not scatter food.
From plywood
To make such a feeder is not so simple, but it is particularly reliable and will also serve you for a long time. In addition to the long operating period, a significant advantage of the plywood feeder is the ability to use it to feed a large number of birds. You will need: a section of the profile (bottom size not less than 6 cm), screws, plywood (2-5 mm thick).
- We cut off the profile of the length we need (based on the number of quail, the size of the cage).
- We cut out two sidewalls from plywood in the form of a boot, the width of the lower edge of the sidewall (the sole of the boot) should correspond to the width of the groove part, and the height to the dimensions of the hopper.
- We insert the sidewalls in the profile.
- We make small bends in the profiles in order to attach boots with the help of screws;
- We cut 2 blanks from plywood, the length of which is equal to the length of the profile, and the height is to the upper edge of the boot, using screws, we fasten them to the sidewalls.
- We cut the front and back walls of the hopper to the actual size of the plywood sheet and fasten it with screws.
- Fasten the structure to the cage with a thick wire.
The choice of feeders and drinkers depends on individual factors. But your experience, as well as specific circumstances will tell you how to make them the most convenient for your birds. Then each of your quail will be healthy and will thank you with useful eggs.
Video "Quail feeding do it yourself"
This video describes the manufacturing process of a feed device from a building profile.
Recommended also
 Lamb recipes in a slow cooker, on the grill and not only secrets
 Tasty and fast dishes: recipes
 Manty test recipe with photo
 Secrets and recipes for cooking fried forest mushrooms
 If life is dear to you: pale grebe poisoning
 Wok noodles with vegetables and mushrooms (cooked using the iCookTM wok pan)