Do-it-yourself sourdough for rye bread. Sourdough bread (without yeast). The benefits of homemade sourdough bread
"Eternal" leaven
There is a nuance: it is easiest to grow the right crop from rye flour: it retains the most beneficial microorganisms and bacteria. There are almost no of them in refined wheat, so it is very difficult to grow sourdough from it: it constantly deviates towards pathogenic flora. I have to throw it away.
The recipe is:
1 day
100 g flour and 100 g water (maybe a little less) Stir well. You should get a pasty mass, like thick market sour cream. Cover with a damp towel and place in a very warm place without drafts. The starter should ferment for about a day. Until small, albeit rare, bubbles appear. It makes sense to stir it sometimes.
Day 2
Now the starter needs to be fed. To do this, add 100 g of flour again and add water so that its consistency returns to the original state of market sour cream. Cover with a towel and leave in a warm place for another day.
Day 3
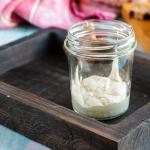
As a rule, now no questions arise: there are not just bubbles on the surface of the starter: it grows greatly in size and all consists of such a foamy cap. We feed her for the last time. And again with warmth. Here is a very important point: the leaven is already quite strong and we need to catch the moment when it will be at its “peak form”: i.e. it should double. At this moment she is at her strongest. We divide it in half.
The first half is our “eternal” leaven. We put it in a jar with a plastic lid with holes in it (so it can breathe) and put it in the refrigerator until next time. And we use the second half to make bread.
Recipes for yeast-free starters for baking bread at home.
These recipes were provided by the bakers of the St. Nicholas-Shartom and St. Vvedensky monasteries of the Ivanovo-Voznesensk Diocese.
Recipe No. 1. Rye bread with yeast-free sourdough.
Sourdough is prepared on some kind of acidic base. Warm brine, peeled rye flour, a little sugar for fermentation. Mix flour to thicken the sour cream. In a warm place the starter will rise slowly.
She needs to be besieged several times. Each time it will rise faster. After the starter is ready, put in the dough: warm water (required amount), starter, salt, sugar (necessary for the starter to work), peeled rye flour. The thickness of the dough is like pancakes. It rises in a warm place for 4-5 hours, you can set it down once. If the dough rises faster, it needs to be settled and kept for 4 hours - this is the norm for rye bread.
Add a little wheat flour (~ 1/10 of the total amount), salt, sugar to the dough batch, and knead with peeled rye flour. The dough is "light".
After the dough has risen, without kneading it, put it into molds (1/2 the volume of the mold).
It is better to work with rye dough by wetting your hands in water. Using a wet hand, smooth it into the mold and place it in a warm place to rise.
Rye bread is baked in a hot oven for 1 - 1.5 hours. After baking, the crust is moistened with water. You cannot cut rye bread right away; it must cool.
The readiness of the bread is checked by squeezing the bottom and top crusts: if the crumb between them quickly straightens, then the bread is baked well.
The first baking may be unsuccessful, but each time the leaven will gain strength and the dough will rise quickly. A little dough or a piece of dough is left for the next baking and stored in the refrigerator.
The night before, you need to update the starter: add a little water (can be cold) and mix in rye flour. It will rise until the morning (~ 9-12 hours) and you can place the dough (see above).
Recipe No. 2. Hop sourdough bread
1. Preparing sourdough
1.1. Pour dry hops with double the volume of water and boil in an enamel (or glass) saucepan until the water is reduced by half.
1.2. Leave the broth for 8 hours, strain and squeeze.
1. 3. Pour one glass of the resulting broth into a half-liter jar, dissolve 1 tbsp in it. a spoonful of sugar, 0.5 cups of wheat flour (stir until the lumps disappear).
1.4. Place the resulting solution in a warm place (30-35 degrees), covering it with a cloth for two days. A sign that the yeast is ready: the amount of solution in the jar will approximately double.
1.5. For two to three kilograms of bread you need 0.5 cups of yeast (2 spoons).
2. Number of components.
To bake 650-700 g of bread you need: 1 glass of water (0.2 liters); For each glass of water you need: 3 glasses of flour (400-450 gr.); salt 1 teaspoon; sugar 1 table. spoon; butter or margarine 1 table. spoon; wheat flakes 1-2 full table. spoons; yeast 1 table. spoon (or sourdough).
3. Preparing the dough.
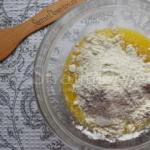
3.1. One glass of boiled water, cooled to a temperature of 30-35 degrees, is poured into the mixing container, and 1 table is stirred in it. a spoonful of yeast or sourdough and 1 cup of flour.
3.2. The prepared solution is covered with a cloth and placed in a warm place for 2 hours until pinpoint bubbles form. The presence of bubbles means that the dough is ready for kneading dough.
4. Kneading the dough.
4.1. In a clean dish (a glass jar with a volume of no more than 0.2 liters, with a tight-fitting lid), put the required amount (1-2 tablespoons) of the dough; this dough will serve as a starter for the next bread baking; it must be stored in the refrigerator.
4.2. Add 2 tbsp to the container with the dough. spoons of flour and other ingredients in accordance with clause 2.1., that is, salt, sugar, butter, flakes (flakes are not a required component). Knead the dough until it sticks to your hands and place it in the mold.
4.3. The form is filled with dough no more than 0.3-0.5 of its volume. If the mold is not coated with Teflon, it must be greased with vegetable oil.
4.4. Place the form with the dough in a warm place for 4-6 hours. To retain heat, it must be covered tightly. If after the specified time the dough approximately doubles in volume, it means it has loosened and is ready for baking.
5. Baking mode.
5.1. The pan should be placed in the middle of the oven on a rack.
5.2. Baking temperature 180-200 degrees. Baking time 50 minutes.
Recipe No. 3. Hop sourdough bread with potatoes.
Pour 15 glasses of water into a saucepan and add two full handfuls of hops. Cover the pan with a lid and boil the mixture for 15-20 minutes. Then filter the mixture, cool to room temperature, add 1-1.5 tablespoons of salt, 1 cup of sugar, 400 g of wheat flour (first grade), stir until the lumps disappear and put in a warm place. After two days, add 1.2 kg of peeled, boiled, cooled mashed potatoes to the hop wort, mix and leave for another day in a warm place. During this period, the yeast is stirred several times. After a day, the yeast is filtered through a sieve and poured into bottles (filled to 3/4). sealed with stoppers and filled with paraffin.
Store in the refrigerator for no more than 1 month.
Yeast consumption: 3 tablespoons per 1 kg of flour.
Recipe No. 4. Ukrainian hop starter
The foam is removed from fermented homemade wine and mixed with wheat bran.
The mixture is dried in the sun or in an oven at a temperature not exceeding 32|C and stored in bags. Before use, the dry mixture is diluted in warm water, wheat flour is added and the liquid mash is mixed. The fermented mixture is diluted with water, filtered through a sieve so that no bran gets into the mixture, and the dough is kneaded.
Yeast from bran, 1 kg of wheat flour (second grade) or wheat wallpaper is brewed with 4 liters of boiling water or hot hop decoction. The brew (it should have the consistency of thick sour cream) is cooled to 70-75|C, 100-150 g of wheat flour is poured into it and mixed well. Add another 100-150 g of flour to the tea leaves that have cooled to 35-37C, mix well, cover the dishes with gauze and place in a warm place for 1-1.5 days for fermentation. Then another 200 g of flour and 300 g of bran are added to the mixture, mixed and left to ferment for 4-6 hours, the mass is mashed with wheat bran and dried. Yeast can be used within 3-6 months.
Store in a double gauze bag, suspended in a cool, dry place.
Before use, the yeast is soaked in warm water, a little flour is added, mixed, allowed to stand for 30-40 minutes, then the dough or dough is kneaded.
Yeast consumption: half a glass (100 g) per 1 kg of flour.
Recipe No. 5. Hop sourdough bread
You can prepare the dough using hop leaven. To do this, you first need to prepare a hop starter. Take 0.5 l. Bring water to a boil, then measure out 3 tbsp. spoons of hop heads and put them into the water. Boil over low heat for 15 minutes. Strain the broth and cool to fresh milk and add a teaspoon of sugar or honey. Nowadays, sugar can be pure or artificial with the addition of gelatin. Gelatin is made from bones. Knead the hop broth with flour until it becomes thick sour cream and place in a warm place to sour for a day, 100 or more. When souring, the mass increases 2-3 times. Remove from a warm place and store it in a cool place or in the refrigerator.
To prepare the dough, you need to prepare a dough. Mix the dough in an enamel bowl. For 1 l. take 4 tbsp of warm water. spoons of sourdough. To prepare 1 loaf of bread you need approximately 1 kg. flour and 1 l. water.
Pour 200 g of warm water into the container, add 4 tbsp. spoons of sourdough. Mix everything, and from the bread taken for cooking, 1 kg. Mix the flour little by little and add it to the container until it becomes thick sour cream. Leave the remaining flour and 800 g of water until the dough is ready. The dough is ready: close, insulate and place in a warm place 30-35| for 6 hours depending on the rise of the dough.
To prepare the dough, take a suitable dough. Pour most of the remaining 1 kg into an enamel bowl. flour, pour in the remaining 800 g of water, stirring, pour in the dough, mix thoroughly, then gradually pour out the remaining flour, add until the consistency of thick sour cream is obtained. Perhaps not all the flour has been used, or some has been added. We insulate the bowl with the dough and set it for 7 hours. (The entire process of preparing the dough takes 12-13 hours, so you should calculate the baking time for the bread). After standing and fermenting the dough, add some flour and knead with the addition of 1-2 tbsp. spoons of natural vegetable oil without any additives (olive, first cold pressed, unrefined), knead until it forms a stiff dough for baking prosphora, or soft dough for baking bread. Place in a warm place for 40-60 minutes. for lifting. Afterwards, we form the dough into a baking tray or a special form, leave it to rise, and then put it in the oven. It is not recommended to add salt, but you can add cumin, coriander, and raisins.
There are many recipes for making sourdough bread at home on the Internet, but they all look overly complicated. Out of habit, it may seem that growing your own sourdough is akin to nursing a wounded hamster, although in fact making sourdough is no more difficult than buying yeast at the store. But the bread that you prepare with your own sourdough will certainly change your ideas about this familiar product: it is tastier, more aromatic and lasts longer.
In addition to the process of preparing sourdough for bread (simple and straight as a stick), we will also talk about how you can use sourdough, because for this you don’t have to look for special recipes: you can bake not only bread with sourdough, but also pizza , pies and other baked goods. So start growing your bread starter today, because in exactly one week I will give you a recipe for my favorite rye bread that anyone can make.
Homemade bread starter
Low
7 days
Ingredients
100 g sourdough
flour
water
How to make sourdough bread
You can make sourdough with any flour, and although it is believed that it will ripen faster with rye, I prefer wheat. The point here is that rye sourdough has a rather specific taste, which is not suitable for some types of baked goods made from wheat flour, but with wheat sourdough you can bake both wheat and rye bread. If possible, use regular flour and half whole wheat flour, but this is not necessary.
So, take a glass or ceramic jar, combine 50 grams of flour and 50 grams of warm water in it, and stir until smooth. Cover loosely (a couple of layers of foil, pierced in several places, will do to allow air flow) and leave in a warm place for 2 days. After this time, the starter should acquire a smell (not very pleasant yet) and bubble slightly: this is a sign that lactic acid bacteria have settled in it.
Starting from the third day, feed the starter by mixing 20 grams of starter (throw away the rest), 40 grams of warm water and 40 grams of flour. The starter should be fed every 12-24 hours - the more often, the faster it will gain the strength we need. The starter is ready for baking bread when it grows 2-3 times in volume within 6 hours after feeding.
How to store sourdough
If you plan to bake bread at least once every two days, the starter can be stored in a cool place, using as needed and feeding in the proportion of 1 part starter - 2 parts water - 2 parts flour every two days. Otherwise, it is better to store the starter in the refrigerator, transferring it to a jar with a lid in which you need to make holes. When storing your starter in the refrigerator, move it to room temperature and feed it 12 hours before baking the bread, and/or feed it every 7 days as described above.
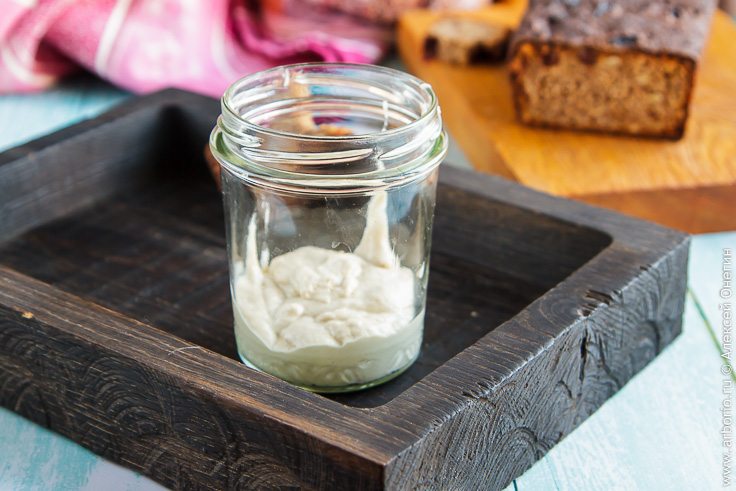
The consistency of the starter will be different at different stages of life: thick after feeding and more liquid after the yeast has worked properly. The photo shows sourdough from the refrigerator, which I just fed, but after spending some time in the warmth, it will become looser and more fluid.
How to use sourdough
It is not difficult to guess that the sourdough we prepared has a humidity of 100%, that is, it contains equal amounts of flour and water. This saves us from having to calculate proportions with a calculator every time we get ready to bake something new. For the dough, use 2 parts of starter to 9 parts of flour, adjusting for the amount of water, and otherwise prepare according to the usual recipe.
I'll explain with an example. Let's say you are going to cook, which requires:
- 250 g flour
- 160 g water
- 1/2 tsp. salt
- 1/4 packet of yeast
Divide 250 grams by 10 to find out how much flour to add to the sourdough, and multiply by two to get the total weight of the sourdough (since flour and water are contained in the sourdough in a 1:1 ratio), and measure out 50 grams of sourdough. Add 250-25=225 grams of flour and 160-25=135 grams of water, and half a teaspoon of salt. Naturally, we cross out the yeast and continue working with the dough in accordance with the recipe.
How to overfeed your starter
If the recipe uses only rye flour, you can also take wheat sourdough and add it to the dough according to the proportions above. But if you wish, you can overfeed the starter by making rye from wheat in order to bake bread with a more sour rye taste. To do this, take 20 grams of starter, add 40 grams of warm water and 40 grams of rye flour, then keep the starter warm and feed it every 12-24 hours in the same proportions. In a few days you will have a completely rye starter that can be used to bake rye bread.
When I became interested in how to bake bread without yeast, using self-grown sourdough, I started reading what they wrote about it on the Internet, and for a long time I couldn’t decide to try it, because I read a lot of positive things like “you can certainly try baking bread.” according to my recipe, but it’s unlikely you’ll succeed right away, since it’s very difficult and not everyone can do it” or “a lot of food went into the trash before I succeeded” or “I baked my 100th bread and only now it’s starting to vaguely resemble something edible" or "take a starter of 75.21 percent moisture, renewed at dawn after the full moon." Of course, I’m exaggerating, but I think many will understand me)))
Having encountered even one in a dozen recipes, such sentiments frighten most beginners and people either generally think that baking bread is something incomprehensible and do not dare, or take a long time to gather their courage, like me. And then I thought that humanity began to produce industrial yeast quite recently, and before that bread was baked with sourdough, and it’s hard to imagine that in some village, a simple woman with a bunch of children and a household, sat and calculated the percentage of moisture content of sourdough or something else. something like that. I realized that the process of baking bread is a natural and generally simple procedure that is accessible to any housewife.
Armed with this understanding, I overcame my fear, began to boldly try recipes that contained less abstruseness and intimidation, the bread immediately began to turn out tasty (yes, sometimes a little better, sometimes a little worse, but always tasty) and gradually I formed several of the simplest and most popular recipes, which I always do well if the main conditions are met: a living and healthy starter, sufficient heat for rising, the right amount of time, good kneading and the desire to feed my loved ones tasty and healthy bread.
At some stage, I was tired of telling my friends and others every time how and what to do, and I compiled a file in which I collected and systematized everything that I understood for myself about baking bread. I’m sharing this information with you, I hope it will be useful to someone.
LEAVEN
Sourdough is a substitute for industrial yeast. It needs to be grown, and then it can be stored for years, becoming stronger and stronger, you just need to feed it on time.
How to grow rye starter starter
It will take several days to grow the starter:
| 1 day | Mix 50 grams of rye flour + 50 grams of lukewarm water in a liter jar, cover with a lid or film (do not close tightly) and put in a cabinet for a day. |
| Day 2 | After standing for a day, the starter should ferment and increase in volume. Add 50 grams of rye flour and 50 grams of lukewarm water, mix, cover and return to the cupboard for a day. |
| Day 3 | The starter continues to ferment. We do the same as on the second day: 50 grams of flour + 50 grams of water |
| 4 day | Everything is the same as the third day. |
| 5 day | The starter is ready. It should be alive, bubbling, voluminous. In total we got about 400 grams of sourdough. From this amount you need to select 100 grams, put it in a jar, close the lid tightly and put it in the refrigerator. This will be the actual starter, from which each of your breads will then be fermented. The rest of the starter can now be used (see advice in recipe No. 1). |
How to handle the sourdough starter?
The starter starter sits quietly in the refrigerator. When you bake bread, take from the jar as much as you need according to the recipe. And immediately add flour and water into the jar (I add 25-50 grams of flour and 25-50 grams of water (25 or 50 depends on how much starter you used for the bread)), mix and put it back in the refrigerator - this is how you feed the starter. If you bake bread regularly, then you won’t have to do anything else with the starter. If you bake rarely, then you need to feed the starter once a week in any case. After the starter has been fed, after some time it will bubble and rise strongly, then calm down. It is necessary that the size of the jar is such that there will be room for lifting.
When dealing with sourdough, maximum care is important: clean dishes, hands, towels. You need to make sure that nothing gets into the leaven except flour and water.
It should look normal, with large bubbles during the active period, and small bubbles during the calm period. It should not be that the flour separates and the water separates. Make sure there is no mold!!! If the starter is very flaky or moldy, throw it away and make a new one. But if the starter is kept in order and fed on time, such troubles should not arise.
RECIPES OF WHEAT-RYE BREAD
Comments for all recipes
- You only need to bake bread in a good mood and with good thoughts!
- Flour is different, so the amount of flour and water indicated in the recipes can be varied depending on the situation. How? - you need to feel it, it comes with experience, first you can do it strictly according to the recipe, and then analyze it and gradually it becomes clear whether changes are needed or not.
- In all recipes you need to use lukewarm water, slightly above room temperature; too warm or hot water can ruin the starter.
- Opara is the preliminary fermentation of part of the flour. The dough is actually the dough itself that will be baked.
- If the dough has stood for as long as it should, but for some reason you can’t immediately knead the dough, don’t worry - just put the dough in the refrigerator and knead the dough later.
- If according to the recipe it turns out that the dough itself needs a little less ready-made dough than what was turned out, then the remaining dough can simply be put in a jar in which the starter is stored.
- The dough must be well kneaded. You need to knead with your hands for at least 15-20 minutes. Since in all the recipes given the dough is sticky and not at all cool, you need to knead in a bowl and not on the table.
- The dough, kneaded and placed into molds, should rise to double in size. The rising time of the dough depends on the strength of the leaven and the room temperature. In the cold season, in order to rise better, it is better to place it either near the radiator, or on the table near the stove when something is being prepared.
- All the recipes below are designed for baking in molds. The most convenient form is a brick.
- If the bread falls off during baking, it means the dough has over-stood or was too liquid; over time, get used to it and this won’t happen.
- If the baked dough is too spongy, the dough was most likely too runny or poorly kneaded.
- Additive options: coriander or caraway seeds (which contribute to better digestion of bread, you need to add a little of them, 1-2 teaspoons), pumpkin or sunflower seeds, flax seeds, sesame seeds, poppy seeds, raisins, bran (seeds), chopped nuts, oatmeal . Add all additives at the end of kneading the dough.
- Before putting the bread in the oven, brush it with water using a baking brush and immediately, before the water dries, sprinkle with sprinkles (cumin, sesame, poppy seeds).
- Place the bread in the oven carefully, without knocking, so as not to fall off. The oven must be preheated well in advance, bake at 200 0 for 40-50 minutes. But ovens are different, so you need to adapt to yours, this is important! The finished bread is golden brown; if you check with a splinter, it should be dry.
- The finished bread must be immediately removed from the pan, otherwise it will get soggy. Allow the bread to cool before cutting. If you start cutting while it’s hot, the dough will drag behind the knife and it will seem like the bread is damp. In general, rye bread tastes better when it has stood.
From the specified quantity you get 1 large brick, weighing 700-750 grams.
| Opara | Rye flour - 150 gr Water - 150 gr |
|
| Dough | Dough - 300 gr White flour - 200 gr Rye flour - 130 gr Salt - 10 g vegetable oil - 1 tbsp Honey (or sugar) - 1 tablespoon Water - 200-230 g |
Advice:
When we first made the starter, after taking the required amount for storage in the refrigerator, 300 grams remained. These are the ones that can be used in this recipe as a dough (that is, take this starter and start preparing bread from the “Dough” stage). True, the leaven is not yet very mature, so for the first time you need to either add yeast, or be prepared in advance for the fact that the bread will take a long time to rise or may not turn out very well. It's not scary. Once the starter is mature, it will work well.
Recipe option No. 1 - with rye malt
| Opara | Rye flour - 150 gr Water - 150 gr Sourdough starter - 2 tablespoons |
Mix everything in a bowl, cover with a towel and leave at room temperature for 16 hours. |
| Malt | Rye malt - 25 g Water - 50 g |
|
| Dough | Dough - 300 gr Steamed malt (see above) White flour - 200 gr Rye flour - 105 gr Salt - 10 g vegetable oil - 1 tbsp Honey (or sugar) - 1 tablespoon Water - 150-180 g |
Mix everything, knead thoroughly. At the end of kneading, add a handful of additives (seeds, etc.) Grease the mold with oil and place the dough into it. Flatten with a wet hand as the dough will stick. Cover with a towel and place in a warm place to rise for 2-3 hours (until it doubles in size). When it’s ready, sprinkle with whatever you want and bake. |
Recipe No. 2
Compared to the first recipe, this bread is more rye (there is 2 times more rye flour than wheat). From the indicated quantity it turns out 2
large bricks, each weighing 850-900 grams.
| Opara | Rye flour - 300 gr Water - 500 ml Sourdough starter - 80 g |
|
| Dough | Dough - 800 gr White flour - 400 gr Rye flour - 300 gr Salt - 1 heaped tablespoon vegetable oil - 1 tbsp Honey (or sugar) - 1 tablespoon Water - 300-320 g |
Grease the mold with oil and place the dough into it. Flatten with a wet hand as the dough will stick. Cover with a towel and place in a warm place to rise for 2-3 hours (until it doubles in size). When it’s ready, sprinkle with whatever you want and bake. |
Recipe option No. 2 - with rye malt
It turns out delicious dark bread like “Borodinsky”
| Opara | Rye flour - 300 gr Water - 500 ml Sourdough starter - 80 g |
Mix everything in a bowl, cover with a towel and leave at room temperature for 10-12 hours. |
| Malt | Rye malt - 50 gr Water - 100 g |
30 minutes before the start of kneading the dough, boil water, pour this boiling water over the malt and let it brew for 30 minutes. |
| Dough | Dough - 800 gr Steamed malt (see above) White flour - 400 gr Rye flour - 250 gr Salt - 1 heaped tablespoon vegetable oil - 1 tbsp Honey (or sugar) - 1 tablespoon Water - 200-220 g |
Mix everything, knead thoroughly. At the end of kneading, add 2 handfuls of additives (seeds, etc.) Grease the mold with oil and place the dough into it. Flatten with a wet hand as the dough will stick. Cover with a towel and place in a warm place to rise for 2-3 hours (until it doubles in size). When it’s ready, sprinkle with whatever you want and bake. |
Recipe No. 3
Unlike the first two recipes, this bread contains more wheat flour than rye flour. From the specified quantity you get 1 large brick, weighing 800-850 grams.
| Opara | Sourdough starter - 2 tablespoons White flour - 2 cups Water - 2 glasses |
|
| Dough | The whole dough (see above) White flour - 1-1.5 cups Rye flour - 1 cup Salt - 2 teaspoons Honey (or sugar) - 2 teaspoons vegetable oil - 1 tbsp |
Mix everything, knead thoroughly. At the end of kneading, add 1 handful of additives (seeds, etc.) Grease the mold with oil and place the dough into it. Flatten with a wet hand as the dough will stick. When it’s ready, sprinkle with whatever you want and bake. |
Recipe No. 4
Pure white bread, although the leaven is rye, it will be lost there and it will be white. From the specified quantity you get 1 large brick, weighing 800-850 grams.
| Opara | Sourdough starter - 2 tablespoons White flour - 2 cups Water - 2 glasses |
Mix everything in a bowl, cover with a towel and leave at room temperature for 12-14 hours. |
| Dough | The whole dough (see above) White flour - 2-2.5 cups Salt - 2 teaspoons Honey (or sugar) - 2 teaspoons vegetable oil - 1 tbsp |
Mix everything, knead thoroughly. Grease the mold with oil and place the dough into it. Flatten with a wet hand as the dough will stick. Cover with a towel and place in a warm place to rise for 2-4 hours (until it doubles in size). When it’s ready, sprinkle with whatever you want and bake. |
Calories: Not specified
Cooking time: Not indicated
We have already told you about. If you decide to bake bread without yeast, you first need to prepare the sourdough starter. Many housewives are popular with eternal sourdough for bread without yeast, which is easily prepared at home. And bread cooked on it cannot compare in taste and aroma with store-bought bread. Sourdough for bread without yeast is eternal, but we must not forget to feed it. The natural yeast contained in it is a living organism.
- Rye flour;
- water.
Recipe with photos step by step:

Take a glass or clay jar with a volume of one or one and a half liters. Next, pour one hundred grams of rye flour into it (peeled or wallpaper, not so important).

Add 200 ml of water to it. 
Stir. 
Close with a nylon lid with holes, cover with a towel and leave it in a dark, draft-free place for 2 days. 
Let's take out our jar. Bubbles are already visible on the surface.

Now you need to add a few tablespoons (2-3) of rye flour (heaped) and water to the contents of the jar so that the consistency is like pancakes.

Place the lid back on, cover and place in the kitchen cabinet. The next day, there are more bubbles on the surface of the starter - the starter is gaining strength. In principle, it will be ready on the third day, but it is recommended to feed it for two more days, then the bread will be more porous.

On the fourth day, the starter is already foaming with might and main. This is a very good sign! We feed it with rye flour and remove it.

Day five. The starter bubbles well, the smell is bready, a little alcoholic. That's how it should be. We feed it as usual and remove it. 

You can now put a regular lid on the jar, without holes. There will be enough air in the jar itself for fermentation.

This is what sourdough looks like, ready to “rush into battle.”
Now all that's left to do is bake the bread. To do this, you will need the starter itself, water, two types of flour: wheat and rye, vegetable oil, salt, sugar and fillers to your taste (oatmeal, bran, flax seeds, peeled sunflower seeds, etc.). For bread you need to take sourdough and an equal amount of water. Dilute the starter with water, add a little rye flour and mix thoroughly. The jar in which the starter was located needs to be washed thoroughly.
Pour part of the resulting mixture back into the jar. This will be the starter for next time. Add sugar, vegetable oil, salt, and fillers to the rest. Mix everything thoroughly. Next, add wheat flour and start kneading. The consistency of the dough should be such that, if desired, it can be rolled out. The baking dish should be greased and sprinkled with a little flour. Pour the dough into half the volume of the mold and put it in a cold oven to rise. The dough takes a long time to rise: about 6 hours. To speed up the process, you can turn on the oven light. The power of the light bulb will be enough to speed up the process slightly. When the dough rises above the edges of the pan, spray the oven with a spray bottle and turn on the lowest heat. When the heat starts, the water will evaporate and the bread will rise even higher. After some time, repeat this procedure again. The entire baking process takes an average of 1.15 hours. To ensure a nice crust on the loaf, moisten it with water a few minutes before finishing.
If there is no cap on the loaf the first time, don’t be discouraged! The leaven becomes stronger each time. Don’t forget to feed it, and then the bread will definitely turn out tall! And there’s no need to say how delicious it is! Try this sourdough recipe! And bread cooked on it will delight you with its taste more than once!
For lovers of traditional bread, we offer a recipe
Bread sourdough
Bread sourdough is homemade homemade yeast made from rye flour (there are other options, but this is the easiest).
In appearance, sourdough for bread is a creamy paste, similar to sourdough for kvass (both in appearance and in meaning). It takes 4-7 days to prepare (depending on the temperature conditions in the house, the hotter it is, the faster it ferments). During preparation, the starter must be fed daily, replacing half of the starter with a similar amount of fresh rye flour and warm water.
At first, as soon as the flour has fermented, the smell is monstrous, it seems that something has gone bad at home. And then it even seems that EVERYTHING has gone bad.
But, after some time, the smell improves and the sourdough smells like fresh kvass. And by the time it is ready, a sharp sour smell appears. After which the starter can be used for various yeast doughs - for baking gray, gray-white or black bread, pancakes, sour pancakes, donuts. But keep in mind that the dough will be sour and is not suitable for every baking.
Store the finished bread starter in a closed jar in the refrigerator, so that pungent odors will no longer bother you.
What is needed for sourdough - composition and proportions
- Rye flour - let there be 0.6-1 kg in stock;
- Warm water;
- A glass jar with a capacity of 0.8 to 2 liters (that is, larger so that the starter has room to grow).
Initially you need 50 g rye flour to 100 g warm water. Proportion 1:2 based on weight.
If you count in glasses (proportions by volume), then you need 1/3 cup rye flour and 2/5 cup warm water. However, you can simplify the calculations and just use 1/2 cup flour and 1/2 cup water. The flour will sour, no doubt about it.

Rye flour, water - the composition of the sourdough. You will also need a jar with a leaky lid.
How to make sourdough
1. First day
- In a jar, combine rye flour and warm water (temperature 36-40 degrees, medium warm, not hot). Mix well.
- Cover with a lid with holes or tighten with a cotton cloth or film (in which you make holes). That is, there must be access to air, from which the bacteria necessary for ripening will enter the starter.
- Leave in a warm, windless place for a day (or 1.5 days). During this period, you need to stir the future starter a couple of times (it is better to ferment in the light, and not in a dark place).
2. Subsequent days (until ready)
Every day you need to feed (renew) the starter with a fresh portion of flour and warm water. For this:
- Remove half of the starter (discard). Instead, add fresh flour and add warm water (take half of the original amount of flour and water. For example: 25 + 50 g or 1/4 cup + 1/4 cup).
- Stir twice during the next day of ripening.
The starter will grow (2 times). As soon as its smell becomes more pleasant and sour, it is ready. After this, the starter can be used to prepare dough.
 What you need for sourdough bread
  Fill the flour with warm water
  Mix water and flour
  The lid must have holes to allow air to flow in.
  The starter is fermenting
  Sourdough lives and grows

Ready sourdough for bread
Storing sourdough in a jar
The finished starter can be transferred to a jar (so that it takes up no more than half the jar, because it will ferment and grow in the refrigerator, only more slowly). Cover with a lid (a regular one, without holes) and place in the refrigerator.
The starter needs to be fed 1-2 times a week. If you are cooking from cold sourdough, you need to remove it from the refrigerator in advance (5-7 hours before or overnight if you will be cooking during the day). And either separate the required portion and revive it, or revive the entire starter, and then take the desired part, storing the rest in the refrigerator. How to revive:
- When separating the amount required for the recipe: combine with 1/3 cup of warm water and 3 tablespoons of rye flour (you can add more sugar or honey), leave in a warm place to revive (5-7 hours or longer). And feed the rest of the starter in the jar: add 1-2 tablespoons of flour and the same number of tablespoons of water and put it in the cold again.
- When reviving the entire starter: combine the entire starter with 3-4 tablespoons of rye flour and 1/3 or half a glass of warm water. And let the starter warm up and grow (5-7 hours, overnight or even the whole day). And then you need to separate the amount of starter you need, and put the rest back in the refrigerator.
Bread sourdough
Storing dry starter
The starter can be dried. To do this, you need to take tracing paper or baking paper. Spread a thin layer of sourdough on it (using a knife or flat spatula). And let it dry. As it dries, break off pieces and put in a jar. Jars of dried starter are stored either in the refrigerator or at room temperature (with a tightly closed lid).
You will get homemade dry yeast, which, to revive, must be diluted with flour or sugar in warm water (as usual, with purchased yeast).
Consumption of bread starter for dough
For 500-650 g of flour (3-4 cups) for pancakes 3-4 tablespoons of sourdough is required. The pancakes turn out great! Without the first pancake being lumpy, they bake right away, pleasantly sour, suitable for stuffing. Yes, and beautiful. Recipe .
For homemade bread, from 4 cups of flour (wheat, wheat + rye, wheat + rye + oatmeal, etc.), take, on average, 1 cup of sourdough (or a little more, you can add another 1/4 cup to this glass to get looser bread).
Variant of sourdough bread composition
- Warm water – 300 g (1 glass + 2 tablespoons);
- Sourdough – 1 glass;
- Rye flour – 100 g (approximately 2/3 cup);
- Wheat flour (regular) – 375 g (2 cups + 1/3 cup) + more for sprinkling the table and baking dish (have extra);
- Salt – 1 teaspoon;
- Sugar – 1 tablespoon;
- Odorless vegetable oil – 30 g (1.5 tablespoons);
- Possible additives: sunflower seeds, walnuts or other nuts, flax seeds - 2 tablespoons of each (flax can be replaced with 1 tablespoon of cumin).
Butter, shortening or margarine for greasing the baking dish.
Making sourdough bread
- Combine all ingredients. Knead the dough. It will be quite viscous. Start kneading first in the pan or bowl in which you kneaded the dough. And then, when it becomes more convenient to work with (less liquid), transfer it to a table sprinkled with flour. Kneading such bread dough takes a long time, about 30 minutes. Baking homemade bread and preparing sourdough is not a quick process in general.
- Grease the baking dish with butter (fat or margarine). Sprinkle flour on top. Place the dough into the mold. Smooth the top part with a wet hand. Cover with a towel and leave to rise (proof) for 3 hours (or longer, if the dough has not risen well, wait until it has at least doubled in size. You can even leave it overnight and bake in the morning).
- Heat the oven to 220 degrees C. Place a cast iron frying pan, mold or baking sheet with water below. Place the baking sheet with bread in the hot oven. Bake, gradually lowering the temperature.
Temperature and baking time for bread
- At 220 degrees C – 10 minutes.
- At 200 degrees C – 20 minutes;
- At 180 degrees – until done.
The readiness of homemade bread is determined in the same way as for a sponge cake - with a wooden stick. If the dough comes out dry, then it's ready. Total time – 40-50 minutes (approximately, focus on the sign of readiness – a dry stick).
- Wrap the finished bread in a clean, damp towel. Place in a plastic bag. Close and keep in the bag for 5-10 minutes (after this the crust will be easy to cut without breaking). Then take it out and wrap the bread in a dry towel, in which you leave it until it cools completely. Some housewives wait another day (it becomes tastier), and only after that they serve the bread to the table.
Another recipe for proportions for homemade bread
- Bread sourdough - 1 cup (or 1 + 1/4 cups - this bread will be more loose); Share with friends!
Shared