Unusual preparations and seasonings from garlic. Beneficial properties of young garlic and its feathers What can be made from young garlic leaves
Today, experienced housewives have come up with a huge number of ways to store vegetables in winter. And garlic was no exception, because frozen garlic retains all its beneficial properties, its taste and aroma. It should be stored in the freezer section of the refrigerator. In this article we will tell you how to prepare green garlic for the winter.
Freezing garlic
Freezing green garlic doesn't require much effort. For this you will need young, fleshy garlic. The upper part with the unopened bud needs to be cut off; it is not suitable for freezing. Rinse the prepared garlic in cool water, dry and cut into small pieces. After this, distribute into containers or bags. Green garlic is ready to freeze.
Did you know? Garlic means “monster killer” in Sanskrit, so in ancient times it was often used not only in cooking, but also to protect pets.

Another good freezing option is garlic with herbs. This preparation can be used to season first courses. In this recipe, we suggest trying freezing in cubes, since it will be very convenient; one cube will contain garlic, parsley and dill, and freezing is no different in complexity.
Take all ingredients in equal quantities. Rinse all greens in cool water, dry with paper towels and chop finely. The top of the garlic needs to be cut off. To freeze into cubes, you will need an edible ice container or silicone molds. You need to pour a little water into them, spread out the chopped greens and put them in the freezer. After 4 hours, when the water freezes, remove the frozen food, put it in a bag and put it back in the freezer.
How to prepare garlic for freezing
 For freezing, it is necessary to select only young green garlic that has not yet bloomed, since it is at this time that it is juicy, tender and breaks very easily; consuming it in winter is the best thing.
When the garlic arrows bloom, they will become coarse and cannot be softened even by cooking.
You need to sort out the green garlic, cut off the top with the emerging bud and the lower ends with scissors. Yellow or yellowed garlic arrows are not suitable for freezing. Rinse the selected garlic in cool water and dry well on paper towels. After this, cut the green garlic into 3-4 cm pieces. The product is ready for freezing.
Options for freezing green garlic for the winter
Preparing green garlic for the winter will not take much of your time. To freeze, rinse the greens under running water, dry and finely chop with a knife. After this, place the greens in bags or containers and place them in the freezer.  In order to freeze garlic arrows, they must be washed and dried well. After this, you need to break off the top with the seeds, and cut the garlic shoots into 4 cm pieces.
Important! Before freezing garlic arrows, they must be blanched in boiling water for 5 minutes.
After you remove the sprouts from the boiling water, immediately place them in a bowl of ice water to stop the cooking process. Once the garlic arrows have cooled, they can be placed in containers or bags and placed in the freezer.
Among the ways to freeze garlic for the winter, preparing a paste that is then frozen is gaining popularity.
To do this you will need garlic arrows, vegetable oil and salt. First, the shoots need to be rinsed in water and allowed to dry a little. Remove the seed boxes and yellowed parts of the stems from the arrows. After this, grind the shoots in a blender or meat grinder. If you use a meat grinder, the grinding process will go faster, and the paste will have a more uniform consistency. 
Add 2 tablespoons of vegetable oil, a little salt to the resulting paste and mix everything thoroughly.
This paste can be frozen by placing it in ice cube trays or using a ziplock bag and spreading it out evenly.
Pickling green garlic arrows
Every year, among the methods for preparing garlic for the winter, pickling green arrows is gaining more and more popularity.
Did you know? Arrows contain a large amount of vitamins, minerals and essential oils, so pickled garlic is very healthy, and every housewife should try this method of canning.
Pickled garlic has a fairly simple recipe; first you need to prepare the marinade. To do this you will need 100 ml of table vinegar, a liter of water and 50 g of sugar and table salt. Place the pan on the stove and boil the resulting liquid. Rinse the green garlic arrows in running water and cut into 4 cm pieces. Place them in boiling water and blanch for 2 minutes. After this, place the garlic in a colander and rinse with cold water. Pickled garlic is perfect for adding to various dishes; it is one of the best options for the winter.
To prepare the jars, wash them thoroughly with baking soda and sterilize over steam for 5 minutes. After this, put a couple of mustard seeds at the bottom of each jar, tightly place the garlic arrows and fill it all with hot marinade. Next, seal the lids tightly, turn the jars over and place them in a warm place.  Among the ways to marinate garlic arrows, this one has proven itself well. korean salad, which is very easy to prepare at home. To do this you will need:
- 3 bunches of green garlic arrows;
- a teaspoon of apple cider vinegar;
- 3 pcs. bay leaf;
- 3 cloves of garlic;
- half a teaspoon of sugar;
- olive oil;
- seasoning for Korean carrots;
- soy sauce.

Then add a little soy sauce, while tasting, add a little more sauce if necessary, stir. Simmer over low heat until the butter, seasoning and vinegar sauce thickens. Turn off the heat and cool the salad a little, pass the garlic cloves through a press and add to the salad.
Important! Place the finished salad in jars and seal them tightly, otherwise the aroma will permeate everything around.
Young garlic will taste like pickled garlic, but at the same time you will get a completely new recipe with an original taste. This dish should be stored in the refrigerator.How to pickle green garlic for the winter
To prepare salted green garlic, take young green garlic shoots, wash them and cut them into pieces 4-5 cm in length. After you have prepared the green garlic, you need to blanch it in boiling, lightly salted water for 3 minutes. Place the finished garlic in a colander and cool with cold water. After this, prepare the brine. To do this you will need a liter of water, 25 ml of 9% table vinegar and 50 g of table salt. Mix all this, bring to a boil, and the brine is ready.
Young garlic (recipes).Fresh green arrows, milky white cloves of young garlic, appearing in the beds in mid-May are a delicacy that is as short-lived as it is attractive. Don't miss your chance to enjoy them.
In the Russian village, young garlic, which appears in the garden beds earlier than other spring vegetables, has always been considered the best remedy for vitamin deficiency. In fact, its crispy green shoots and snow-white cloves, which have not yet acquired a pungent garlic taste and smell, are replete with the very vitamins and microelements from which our body suffered most during the winter. However, those who consider young garlic a sign of exclusively country cuisine will be mistaken: Catherine the Great wrote about her love for this “common” delicacy, and at the courts of the French monarchs of the 18th century, the gardener who was the first to deliver fresh garlic heads to the royal table in the season received a generous reward . The life of young garlic is very short-lived: already two weeks after emergence, the heads begin to become covered with a rough peel, and the greens lose their tenderness. That is why those who want to try this spring delicacy should not waste time.
Seven clothes
Traditional medicine attributes the ability to heal seven diseases to the membranes surrounding each garlic clove (according to legend, there are always exactly seven of them). Whether this is true or not is unknown, but for culinary purposes these films are truly irreplaceable. Cut into thin strips and added to a salad, sauce or omelet, they will add a subtle, subtle garlic flavor to any dish without the slightest admixture of bitterness or spiciness. And don’t forget that the sooner you peel the cloves from these translucent skins, the longer you can keep the garlic intact - peeled cloves can be stored for up to three days without losing their freshness.
Green feather 
Juicy garlic arrows are the quintessence of spring freshness. Alas, the lifespan of cut arrows is very short: after just a few hours, their edges turn yellow, and they themselves lose their aroma and pleasant crispness. The best way to preserve garlic shoots for a long time is to pickle them. Finely chop the greens (you can use a food processor for this purpose) and mix them with coarse salt in a one-to-one ratio, place the resulting emerald mass in pre-sterilized jars. This aromatic seasoning will remind you of the spring sun until next year and serve as an excellent addition to meat, soups or sauces.
Milk ripeness
Young, milky ripeness, garlic has a much less coarse and intense taste than its more mature counterpart, and, unlike it, does not leave behind an unpleasant odor. However, if you are still afraid of the spiciness, you can bake the young garlic cloves - this way you will preserve their fresh original taste, but completely get rid of their inherent harshness and specific aroma. To do this, peel the garlic from the top scales and, cutting off the bottom of the garlic head, wrap it in foil. Bake the resulting package in an oven heated to 180 degrees for 15–20 minutes. Spread on crispy toast soaked in olive oil, baked garlic pulp will become a delicious delicacy that can decorate both a modest family breakfast and a festive buffet.
As soon as young garlic appears on sale, hurry to use all its capabilities. And they are huge! Unlike its autumnal, much aged sibling, young garlic can be eaten raw without wincing, added whole heads to vegetable, meat and fish dishes, and made into purees and soufflés. By the way, oven-baked garlic is an amazing side dish for any fish dishes.
Spaghetti with fried garlic
Serves 4.
4 heads of young garlic
350 grams thin spaghetti
1 tablespoon chopped parsley
4 chili peppers
4 tablespoons extra virgin olive oil
coarse sea salt
fine sea salt
freshly ground black pepper
Peel the top skin of the garlic and separate the heads into cloves, without peeling off the thin bottom skin (the excess should be finely chopped). Do not throw away the green arrows - cut them into 3 cm pieces. Heat the oil in a thick-walled pan, add garlic cloves, pieces of thin outer skin and herbs. Add capsicum, salt and pepper. Fry all ingredients for 10 minutes, then sprinkle with parsley and stir.
Boil the spaghetti in boiling water with the addition of coarse salt. Two minutes before the garlic is ready, drain the paste in a colander and, using two forks, transfer it to the pan with the garlic for another 10 minutes. Stir the spaghetti until it is fried in the oil and soaked in the garlic sauce. Serve them warm, but not too hot.
Young garlic with spices
Serves 6.
30 cloves of young garlic with skin
250 ml extra virgin olive oil
100 ml grape seed oil
2 chili peppers
2 pcs. carnations
2 bay leaves
1 sprig fresh rosemary
3 pinches fine sea salt
1 teaspoon mixed peppers (peas)
Wash and dry the capsicum, rosemary and bay leaf. Select the largest cloves from several garlic heads. Without removing the skin, place them in a saucepan, sprinkle with salt, add chili peppers and cloves, as well as bay leaves, peppercorns and rosemary. Pour the mixture of two oils over the garlic and spices (the oil should cover them slightly). Cook over low heat for 15 minutes – the oil should not boil. Remove the pan from the heat, cool, and then transfer its contents to a jar, close it and put it in the refrigerator. Remove the garlic cloves from the jar as needed and serve them warm with fried or stewed meat, fish or vegetable stew. In addition, harvested garlic can be used to decorate pizza, as well as as a filling for baked bread. And flavored oil is perfect for frying meat, fish and vegetables.
Fried young garlic arrows
Cut the arrows into pieces about 5-7 cm long.
Heat a little vegetable oil in a frying pan, fry the arrows on one side over medium heat, turn them over, cover with a lid and cook for about 5 minutes. They will become softer.
Salt, pepper, sprinkle with lemon juice.
MARINATED YOUNG GARLIC
young garlic
salt
sugar
curry
allspice
grape vinegar 5%
Cut off all excess from the garlic - stems and roots.
We clean the heads of all the husks, leaving only the closest layer to the garlic cloves themselves.
It is not recommended to wash garlic!
MARINADE
For 1 liter of grape vinegar 5% -
50 g rock salt
- 50 gr. Sahara
- 10 peas of allspice
- a little less than half a teaspoon of curry
Pour vinegar into the bowl.
Add salt and sugar.
Stir until salt and sugar dissolve.
Place the peeled heads of garlic in a jar.
Add curry and peppercorns.
Then pour the vinegar over the garlic until it is completely covered.
Close the jar with a lid and place in a cool, dark place.
Garlic is marinated for at least 2 months.
But the longer the garlic is pickled, the tastier it is.
Baked potatoes with young garlic and mint
What do you need:
young potatoes 1 kg
1 head young garlic
mint medium bunch
extra virgin olive oil 2/3 cup
coarse sea salt
freshly ground black pepper
What to do:
Wash the potatoes with a brush and, without peeling, prick them with a fork. Place on a baking sheet and bake in an oven preheated to 170°C for 1 hour. Separate the mint leaves from the stems. Chop the stems and place in a blender along with peeled garlic cloves. Pour in the oil and beat until smooth. Chop the leaves. Cut the finished potatoes into quarters while hot, pour the resulting green oil, salt, pepper and stir. Let sit for 5 minutes, sprinkle with mint leaves and serve hot or warm.
Carrot salad with young garlic
Ingredients: 1 kg of young carrots, 3-4 heads of young garlic, 100 ml of red wine, 4 tbsp. tablespoons olive oil, 4 sprigs rosemary, sea salt, freshly ground black pepper.
Cut the carrots into thin slices diagonally. Heat olive oil in a frying pan, place carrots in one layer, add salt and pepper, sprinkle with 3 sprigs of rosemary and fry on both sides. Pour in red wine, add coarsely chopped young garlic and simmer for another 5 minutes.
Place the carrots in a salad bowl, sprinkle with the remaining rosemary and drizzle with a few drops of olive oil.
LOBIO WITH FRESH HERBS AND YOUNG GARLIC
PRODUCTS:
Beans beans - 500g.,
onions - 3 pcs.,
young garlic - 2-3 stalks.,
cilantro - 1 bunch.,
savory - 4-5 vet.,
regan - 4-5th century,
vegetable oil - to taste,
capsicum, salt to taste.
Cooking beans: Place the grains in a kotani (clay pot), but you can also cook them in a cast iron pot. Add water and place on the fire divider and cook. During cooking, add a little BOILING WATER if you are cooking in a clay pot or cold water if you are cooking in a cast iron pot. Cook until the grains burst and are well cooked. Ready and seasoned lobio should be thick and have little liquid, so add water a little at a time during cooking.
Onion: Finely chop the onion into half rings.
Greens: Finely chop the greens with a knife.
Garlic: Cut the stems of young garlic along their entire length and cut into thin half rings.
Capsicum pepper: Cut the capsicum into thin rings.
Cooking method:
You need to add everything to the finished boiled lobio at the same time and immediately turn off the heat. Cover with a lid and let stand for 5-10 minutes.
Tortiya with young garlic.
We will need:
300 g young garlic
4 eggs
salt pepper
Break the garlic sprigs and boil in salted water until soft, drain. In a bowl, beat the eggs with salt and pepper, add the squeezed garlic, stir and pour into a heated frying pan with a small amount of olive oil (1 tbsp.)
Fry first on one side, then use a plate to turn over to the other side and fry.
Chicken breasts with mozzarella and young garlic
Ingredients:
chicken fillet 500 g (4 pcs)
mozzarella cheese (piece) 70 g
several sprigs of dill
young garlic 5 cloves
tomato 1 pc.
salt, ground pepper
wheat breadcrumbs
cream 100 g
egg 1 pc.
frying oil 1 cup
for appetizer side dish:
basil leaves
mozzarella cheese (balls)
several small tomatoes
Cooking method:
Cut the small fillet and use it in another dish. Cut a large fillet lengthwise in the middle, unfold it like a book, and beat it with a mallet. Salt and pepper each. Grate the cheese finely, mix with chopped dill and garlic, passed through a press. Cut the tomato into slices. Place 1/4 of the filling on one half of the fillet and place 1-2 tomato slices in the middle. Cover with the other half of the fillet.
Connect the edges with a skewer. Beat cream with salt, egg and chopped dill. Pour the crackers into a plate. Dip the stuffed fillet in cream, then sprinkle with breadcrumbs. Do this with each fillet. Heat oil in a saucepan. Quickly fry the fillet, place in a refractory dish and cook for 10 minutes in the oven until cooked through. For the garnish, cut the tomatoes in half, add salt, cheese and basil leaves to attach to the tomato halves with a skewer.
Serve the fillet hot (do not forget to remove the skewer from the finished fillet before serving), place the prepared side dish next to it.
Lamb with young garlic
What you need: lamb ribs 500 g
4 heads young garlic
vegetable oil 75 ml
For the marinade:
onion 1 pc.
bunch of parsley
black pepper (peas) 10 pcs.
carnation buds 2 pcs.
cumin 0.5 tsp
ground coriander 0.5 tsp.
salt, pepper to taste
What to do:
Peel the onion and chop finely. Wash the parsley, dry and chop. Grind black pepper, cloves and cumin in a mortar and pestle.
In a large bowl, mix onion, parsley, chopped spices, salt and vegetable oil.
Wash the ribs, trim off excess fat, place in a bowl with the marinade, stir. Cover and leave in a warm place for 30–40 minutes.
Wash the heads of young garlic, dry them and cut them in half lengthwise. Lightly salt and pepper.
Lightly shake the ribs and place them in a baking dish. Place in the oven and cook at 220°C for 15 minutes.
Add the garlic to the dish with the meat and cook at the same temperature for another 10 minutes.
Perch with garlic sauce
2 medium sea bass
1 head of young garlic
200 ml cream
medium bunch of dill
salt, freshly ground white pepper
vegetable oil for frying
Disassemble the garlic into slices and, without peeling, bake in an oven preheated to 220 °C for 15-20 minutes. Then peel off the skin and mash it into a puree with a fork. Chop the dill and add to the garlic mass, then pour in the cream and stir. Season with salt and pepper
Clean the fish, gut it, remove the head, tail and fins; wash, dry and fry in hot oil over high heat for 4 minutes. from each side.
Reduce heat, cover the pan and cook for another 5 minutes. Pour the garlic sauce over the fish and serve immediately.
Spring soup
Sort through, rinse thoroughly and finely chop 1/2 kg of sorrel and several feathers of young garlic, simmer in 2-3 tbsp. spoons of heated vegetable oil.
Add 1 - 2 tbsp. spoons of flour and enough boiling salted water to make a moderately thick soup, put peeled and chopped potatoes into it and cook until tender.
Before serving, add finely chopped parsley and sour cream.
Stuffed squid
Ingredients:
squid - 6 carcasses
eggs - 3 pcs
rice - 1 cup
carrots - 1 pc.
green onions - a bunch
young garlic - bunch
sour cream - 3 tablespoons
walnuts - 10 pcs
hard cheese - 50 g
Peel the carrots, three on a coarse grater.
Brown the walnuts in a frying pan.
Boil the rice, clean the squid, boil in salted water for three minutes.
Peel the rosy nuts and chop them.
Finely chop the onion and garlic.
Chop the eggs.
Mix rice, nuts, carrots, onions and garlic.
Three cheese on a grater.
Add cheese to the minced meat, salt and pepper, mix well.
Stuffing the carcasses.
Cover the pan with foil, lay out the stuffed carcasses, pour in sour cream, and cover with foil.
Place in the oven for 20 minutes. Serve sprinkled with herbs.
POTATO CASSERLE WITH “FRIED GLASS”
Finely chop two boiled chicken fillets or grind in a meat grinder. Grate 150 grams of cheese on a coarse grater. Mix chicken meat and cheese, add dry or fresh herbs. I added dry dill and dry green onions.
Boil the potatoes. To improve the taste, add young garlic and dill stems to the water. Mash the potatoes until smooth, add butter, salt, pepper, dill and green onions. Place potatoes, chicken with cheese, and potatoes in layers in a mold.
Grease with sour cream. Make indentations on the surface and pour quail eggs into them.
Bake in the oven until the eggs are ready.
This casserole is good served with sauce or ketchup.
Avocado sauce with herbs
Ingredients:
1 avocado
1 onion
bunch of sorrel
2 pieces of young garlic
parsley, cilantro, dill
1/2 jar pitted olives
juice of 1/2 lemon
cayenne pepper on the tip of a knife
1 tablespoon olive oil
salt
Preparing the sauce:
Peel the avocado, remove the pit and cut into pieces.
Wash the sorrel, onion, garlic and herbs, dry and cut.
Grind everything in a blender with lemon juice and olive oil, salt to taste.
Can be served with both fish and meat.
Tuna with chanterelles
Serves 4
- 1 large piece of tuna from the thickest part of the fish
- 100 ml olive oil
- 1 bunch of chervil or tarragon
- 1 bunch of green onions with bulbs
- 4 cloves of young garlic
- 600 g small fresh chanterelles
- salt, ground black pepper
1. Wash the tuna with cold water, dry with a paper towel, cut into large slices, placing them one by one in olive oil. Then turn the slices over, dip them into the oil again and keep them there while the vegetables and mushrooms are cooked.
2. Peel the onion and garlic, cut the onion into thin rings, the garlic into thin slices. Wash the chanterelles, removing the roots stained with soil, and cut them if they are large, and if they are small, fry them whole.
3. Remove the tuna slices from the oil and drain thoroughly. Pour this oil into a large frying pan and fry the fish pieces on both sides. They should be browned on the outside, but still moist and tender on the inside.
4. In another frying pan, fry the onions and chanterelles in a small amount of oil. When they are browned, add garlic.
5. 5 minutes before serving, place the pieces of tuna and chanterelle with onions in one frying pan and keep on high heat.
6. Before serving, place the tuna slices on heated plates, lining them with chanterelles and onions, sprinkle with guerande salt and chervil or tarragon leaves.
7. Finally, sprinkle the tuna and chanterelles with black pepper from the mill and serve immediately.
Peperonata with young garlic
For 4 servings:
3 small zucchini
1 eggplant
1 green pepper and 1 red pepper
5 very ripe tomatoes
1 green onion
1/2 head of young garlic
2 coffees l. concentrated tomato paste
fresh basil and thyme
olive oil
Red hot pepper
ground salt and pepper
Preparation:
Peel the zucchini and eggplant, remove the seeds from the pepper.
Cut all vegetables into pieces.
Peel the onion and garlic. Chop the onion.
Heat 3 tbsp in a thick-walled saucepan. l. olive oil and fry the garlic, onion and thyme sprig. Once golden, add vegetables. Salt, pepper, add hot pepper. Leave on medium heat for about 5 minutes.
Peel the tomatoes and remove seeds and cut into squares. Add tomatoes and pasta to the pan. Close the pan and simmer for 15 minutes. When the vegetables are ready, remove from heat and serve. Can also be served cold.
Pickled garlic arrows
LEAVING
For a 700 gram jar:
250~300g young garlic, 18~20g salt, 18~20ml 4% vinegar, 1.5 cups water
Garlic arrows should be taken young, with flowers that have not yet bloomed. The older the plant, the harder and more “wiry” the shoots become. For old arrows, you can only use the upper, still soft, parts that are located closer to the flower.
Wash the garlic arrows, trim off the flower heads and cut into 3~5 cm pieces.
Place the cut pieces in boiling water for 2~3 minutes. Then drain the boiling water and pour cold water over the garlic to cool.
Place a sprig of dill (if possible) at the bottom of the jar and place the arrows tightly. You can put another sprig of dill on top.
Prepare the brine: dissolve salt in boiling water, cool, add vinegar.
Pour chilled brine over garlic. Place pressure on top.
Fermentation at room temperature should begin on the 3rd~4th day and continue for 10~14 days.
During the fermentation process, you need to periodically remove the film that forms and add brine (without vinegar) if necessary.
Store the finished product in the refrigerator.
Chicken in sweet and sour marinade
Ingredients:
Chilled chicken, cut into portions
About 0.5 tbsp. apricot jam
1 tbsp. balsamic vinegar
2-3 tbsp. soy sauce
Young garlic
Lemon juice
Preparation:
Chop young garlic. Mix the remaining ingredients.
Place the chicken in a bowl and pour over the marinade. Mix well and leave for a couple of hours.
Then onto a baking sheet and into a hot oven until cooked and golden brown.
Tomato soup
For 4 persons
1 kg tomatoes
2 cloves young garlic
2 tbsp. l. olive oil
2 tbsp. l. wine vinegar
4 pinches of nutmeg
salt pepper
Preparation
Place the tomatoes in boiling water for 10 seconds, then rinse them with cold water, peel them, cut them in half and remove the seeds. Grind the pulp and blend in a blender with vegetable oil, vinegar, nutmeg, salt and pepper.
Squeeze the juice out of the garlic. Beat for 2 minutes at high speed. Place in a cool place.
Garlic is an excellent protector of the immune system, especially in winter, when terrible viruses are walking the streets. The bioactive substances contained in it allow it to be considered a full-fledged medicine. When you no longer want to eat it raw with borscht, you can always quickly roll up green garlic for the winter: preparations with this medicinal plant can easily be stored in the cellar for several years. It’s hard to imagine eggplants and hot sauces without it. Garlic is added to Georgian dishes and to beets when pickling. It is dried, prepared whole and in cloves, in mixtures and seasonings, and twisted with lard.
There is enough garlic in every dacha, and sometimes it grows everywhere just like a wild herb like wild garlic. A very unpretentious plant. It is customary to eat not only garlic heads, but also arrows, feathers and green fruits. If there is a big harvest this year and you still have time to pickle the slices, try processing the collected surplus using these simple recipes. It turns out very tasty, you'll lick your fingers!

Recipe for making green garlic for the winter
Perhaps the most popular method of homemade twisting: we pull out the garlic with the roots, since we will use both the heads and the stems with arrows. Be sure to make sure that the onion is still “green” and tender, since using thick garlic for this purpose is useless. In the video, the degree of maturity was chosen well.
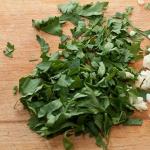
Advice: It’s good if, along with the garlic shoots, you can find a variety of greens on the site, for example, parsley, green onions or dill. These ingredients make up an amazing medicinal mix that will provide you with the necessary vitamins in the harsh winter.
Ingredients
Servings: – +
- green garlic 1 kg
- bunch of greenery 100 g
- salt 200 g
Per serving
Calories: 114 kcal
Proteins: 5.3 g
Fats: 0.4 g
Carbohydrates: 23.6 g
20 minutes. Video recipe Print
We sterilize the jars in advance: we either boil them or leave them in the oven to warm up.
The most painstaking task is peeling young garlic. We cut off the roots and pull the first leaf from top to bottom all the way to the bulb, and in this way we peel all the garlic.
As a result, we should have two different stacks - bulbs with stems and leaves. If they are still wet, there is no need to dry them.
We scroll the bulbs and petioles through a meat grinder, and grind them in a blender or food processor (then it is better to pre-cut).
Finely chop the feathers with a knife and add to the chopped onions. Mix thoroughly into a homogeneous mass, chop the parsley into the same bowl.
Let's continue cooking. Add 2 tbsp. spoons of salt and mix well.
Pour the garlic and salt into containers (200 g will be needed for a liter jar). The end result should be beautiful white-green layers, even show them in photos!
If you add salt as the last layer, the twist will last longer.
Rate this article
Did you like the recipe?
Gorgeous! We need to fix it
We close the jars using the usual technology and move them to storage in a cellar or basement until winter. At low temperatures, such a preparation will last for several years, or even more, and will retain its properties and will not lose its aroma and piquancy. But don't make too much unless you're sure you'll eat the garlic twist before next summer.
Advice: Be sure to label the contents and attach stickers to each jar. It’s also a good idea to indicate the date of preparation, so you’ll be sure which preparation can be used and which should be thrown away. Remember that every food product, even garlic, has its own expiration date!
Hot garlic prepared according to this recipe can be added to a variety of soups or borscht, to cereals and Korean carrots, stewed and fried meat with it. The only condition is that the products do not need to be seasoned with salt, because there is enough of it in the twists.
Garlic in oil for the winter
For future use, it will never be superfluous to make a jar or two of good vitamin preparation. Garlic should not be overused, but its benefits should not be underestimated.

Only garlic cloves are suitable for rolling, and it is best to use olive oil, which has much more benefits than sunflower or any other vegetable oil. As a result, you will end up with a flavorful and spicy appetizer to go with vodka or borscht, so it’s always nice to find such a preparation in the cold winter, when you crave garlic the most.
Cooking time: 10 minutes
Number of servings: 8
Energy value
- proteins: 3.2 g;
- fat: 48.9 g;
- carbohydrates: 14.6 g;
- calorie content – 508.2 kcal.
Ingredients
- garlic – 400 g;
- olive oil – 400 ml;
- basil – 1 sprig;
- ground paprika – 10 g;
- salt – 1 tsp.
Step-by-step preparation
- We disassemble a whole head of garlic into cloves, peel it and rinse thoroughly.
- Place in a small container, sprinkle with salt, stir and let stand for a few minutes.
- At this time, it is advisable to start sterilizing the jars. Although garlic repels bacteria, this does not mean that the containers do not need to be treated. This must be done, otherwise the canned garlic may ferment.
- After time, rinse off the salt and place in sterilized jars, alternating with basil leaves. After preservation, they will give an amazing aroma that cannot be compared with anything else.
- Before pouring the oil, it is correct to pasteurize it. If it is in a glass bottle, you can heat it in a water bath and let it simmer for 10 minutes.
- Pour hot oil into the jars of garlic, and already at this stage you can notice what an amazing smell the preparation has!
- The finishing touch will be red paprika, and then we roll up the jars using the usual method and leave until they cool completely. The finished appetizer has a pleasant golden color, so it will be a wonderful decoration for any table, be it a festive one or an ordinary evening one.
The rolled jars can be moved to a cool place or allowed to steep in the refrigerator for several weeks, and then eaten immediately. In the basement or cellar, the preparation will last for a couple of years, but, as a rule, such delicious snacks do not even survive until winter, since crunching salted garlic is pleasant at any time of the year.
Preparing garlic arrows for the winter
As a rule, not only garlic bulbs are used, but also all other parts. In the first recipe, the option with arrows scrolled through a meat grinder was considered, but the stems can simply be cut to be eaten as a regular snack in winter, added to salads, in first courses, or stewed with meat.


Pickled arrows form part of the winter diet in the same way as cloves, since they are no less useful than ripe garlic. If previously housewives threw away the stems as unnecessary, now there is no need for this, because they can be cooked deliciously - preserved with vinegar and spices!
Cooking time: 20 minutes
Number of servings: 22
Energy value
- proteins: 3 g;
- fats: 0.3 g;
- carbohydrates: 16.5 g;
- calorie content – 77.1 kcal.
Ingredients
- garlic – 1 kg;
- water – 1 l;
- peppercorns – 10 g;
- bay leaf – 10 g;
- salt – 50 g;
- sugar – 50 g;
- vinegar 9% - 100 ml.
Step-by-step preparation
- Peel the green arrows, rinse, cut into small sticks and blanch in hot water for 2-3 minutes using a slotted spoon so that they soften and subsequently release more juice. Allow excess water to drain; no need to dry thoroughly.
- Place peppers and bay leaves in pre-sterilized jars.
- Lastly, we lay the arrows, which will already have time to cool a little.
- Pour salt, sugar and vinegar into hot boiling water and, stirring constantly, turn it into a flavorful marinade.
- Fill the jars until the arrows are completely submerged.
We also recommend
 Pumpkin Pie Pumpkin Pie with Almond Flour
 Beneficial properties of young garlic and its feathers What can be made from young garlic leaves
 Cod for children Pollock cutlets for children
 Gooseberry mojito compote for the winter Gooseberry mojito compote for the winter
 Is it possible to bake chicken in foil in a slow cooker?
 How long should you cook the champignons until they are done?