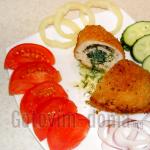
Chicken Kiev cutlets. Chicken Kiev cutlets Making chicken Kiev cutlets
Once the girls and I gathered at a restaurant on March 8th. We ordered a lot of things, but we also decided to try one dish – homemade chicken Kiev. And they were delighted, they were so tasty, and the filling literally “poured out” of them.
How many times have I tried to cook them at home, but I just couldn’t get them to turn out juicy and appetizing like in a restaurant. But I wasn’t very upset, I knew that if you try hard, everything will work out.
And then one day I was watching TV and came across a cooking program that told me how to properly cook chicken Kiev at home. And cook so that they turn out with the “correct” crust and tender juicy pulp.
It’s done, this program has finally brought good luck. Now I always cook chicken Kiev using this recipe. This is a very easy and simple recipe that takes minimal cost and time.
Try making these cutlets and you will fall in love with them, just like me!
Read also:

Ingredients:
- Chicken breasts - 3 pcs. (average)
- Butter - 250 g
- Eggs - 3 pcs.
- Flour - 6 tablespoons
- Breadcrumbs - 9 tablespoons
- Vegetable oil for frying
- Dill greens
- Salt, pepper, curry - optional

Classic recipe for Kiev cutlets
1. First of all, let's prepare the filling. To do this, you need to take out the oil in advance so that it is soft. We wash and dry the dill. Chop as finely as possible.
Mix oil and dill. Form balls with your hands and freeze them thoroughly. This makes it easier to form cutlets.

2. Cut the chicken fillet into two parts, cut off all the fat and membranes.


4. Cover the meat with cling film. We beat it with the flat side of the hammer.

5. After thorough but gentle beating, the chicken meat will become noticeably wider and flatter.

6. Place both fillets – large and small – on a cutting board.

7. Sprinkle with salt and spices. Place the chilled filling on a smaller piece.

8. Wrap the smaller fillet tightly. Place it with the filling, seam side down, onto the larger fillet.

9. Roll the meat very tightly so that the edges overlap one after the other.

10. This is what the cutlet should look like from the bottom where the seam is. Quite tight and secure.

11. Prepare everything for breading: beaten egg, flour and breadcrumbs, preferably homemade.
First of all, roll the cutlets in flour.

12. Using a spoon or spatula, transfer the Kiev cutlet into the egg.
Dip thoroughly so that the egg completely envelops the cutlet.

13. Transfer to breadcrumbs. The entire cutlet should be covered with breadcrumbs.

14. We will do this procedure with all semi-finished chicken products.

15. Pour refined vegetable oil into a small saucepan, deep fryer or frying pan so that it covers the cutlets up to half their height. That is, much more than usual.

16. Fry until beautifully crispy on both sides.

17. The filling comes out very juicy and tasty. This is a real classic recipe. You cut the cutlet, and aromatic butter flows out of it.
How to cook delicious cutlets
Such a familiar dish can surprise even the most notorious gourmets with its taste. You just need to know the recipe, how to properly cook Kiev cutlets
1 hour 40 minutes
290 kcal
5/5 (2)
What kind of dish is this: “Cutlet Kiev”?
Kiev cutlet is a very popular dish all over the world. And, despite the fact that the name indicates that it belongs to Ukrainian cuisine, there are quite a lot of stories of its origin.
For example, the French version, in which the authorship belongs to Nicolas Appert. There is a version about her first appearance in the St. Petersburg Novomikhailovsky club. However, it is believed that she owes the addition of butter to the Kyiv restaurateur. It was his idea leave the cutlet on the bone, thereby imitating a chicken leg.
In the classic version, the dish consists of pounded chicken fillet with butter inside. At first, the butter was beaten into the fillet with a hammer, later it began to simply be wrapped in cutlets. Let's find out how to make this wonderful dish at home.
How to cook chicken Kiev
Ingredients
 First you need to prepare the filling.
- Take the melted butter and mash it with a fork. Add chopped herbs, pepper and salt and mix everything thoroughly until a homogeneous mass is formed. Then form oval balls from the resulting mass and place in the freezer for 5 minutes, then when preparing the cutlets, the filling will remain intact.

- Now the time has come prepare chicken fillet. Remove the tendons and bones from the fillet and beat it. When the fillet is ready, remove the prepared balls of butter and herbs from the freezer and distribute them evenly over the fillet, based on the required number of cutlets.

- The density of the meat should be uniform and without holes, otherwise the oil will leak out during frying and the cutlets will not turn out. The cutlets should also be kept in the freezer for a while so that they retain their shape when frying.
- Now it's time for the top layer.
Break the eggs into the milk, beat the mixture with a whisk. Be careful not to overcook the cutlets in the freezer - they should not fall apart, but not become oaky. After refrigeration, they need to be sprinkled with pepper and rolled in flour and only then dipped in a mixture of milk and eggs.
- After that you need to roll them again in breadcrumbs.
- Kiev-style cutlets are also fried in a special way: pre-deep-fried for 3-4 minutes so that the minced meat and breading “set”, then they need to be further fried in the oven or in a frying pan for 10-15 minutes.

- Serving this dish is a responsible matter: Kiev cutlets must be served immediately after frying, otherwise they will lose their special taste.
How to make sure your dish turns out right the first time
Firstly, strictly adhere to the recommended quantities of ingredients.
Secondly, use high-quality fillet for cooking, without film and cartilage.
To avoid cooking the cutlet on the bone, as the original recipe calls for (the fillet must be cut so that the meat remains on the bone), the bone can be added to the finished cutlet before frying it. With the bone, the cutlet should resemble a chicken leg.
To vary the taste, you can add to the cutlet yolk or cheese.
This is what a properly formed cut should look like - thin crispy breading, juicy chicken breast and a cavity inside from which aromatic butter flows - very tasty! This juicy cutlet is familiar to many, it’s only a pity that nowadays it has become an ordinary fast food and has lost its sophistication and unforgettable taste. What the food industry offers us in the form of frozen semi-finished products cannot be compared with a cooked cutlet in the home kitchen with your own hands. The process of preparing chicken Kiev is not simple and requires some preparation, but the result is worth it.
You will need:
- ground black pepper
- butter 100 gr
- egg 2 pcs
- flour 2 tbsp.
- breadcrumbs 1 cup
The classic Kiev cutlet is made from pounded chicken breast, in which butter is wrapped. The fillet is placed on the wing bone, so the appearance of this cutlet is very similar to a chicken leg. For the first time, a Kiev restaurateur came up with this idea, so its name includes the wonderful city of Kyiv. It is almost impossible for a novice cook to achieve a high-quality result the first time - it is difficult to form a cutlet so that the butter does not leak out of it when frying, and even more so to make a structure together with a bone. But don’t despair, you can resort to little tricks and you will succeed.
Firstly, the bone is not necessary at all- this is comforting news. And secondly, you need to take care of the filling for the cutlets in advance - butter, maybe even in a few days. I advise you to buy natural butter 80-82.5% - this seemingly invisible ingredient plays a vital role in cooking. Only real butter will give the Kiev cutlet an unforgettable taste, juiciness and aroma.
Step-by-step photo recipe:
Cut the butter into 4 pieces, arrange them on a plate so that they do not stick together and place them in the freezer so that they frozen well- this is the main trick - frozen oil will melt more slowly when frying, will not begin to boil inside the cutlet and tend to escape outside. If desired, pieces of butter can be made more rounded, if you have time, tinker. I used herb oil, but this is optional. How to prepare this oil, see →
Advice: When I cook chicken breast fillets, I cut off the so-called arrow - a small part - it always gets in the way. By the way, it is this small part that is used in classic Kiev cutlets - they wrap the bone in it and this “construction” is wrapped inside a large fillet. But, since we decided to make the process easier, we boldly cut it off. Such arrows from four to five fillets correspond in weight to one full fillet.
You can cook with them and feed the whole family with one breast.
Breast cut in half lengthwise without cutting all the way through.
Expand in both directions - you get a large, thin piece.
Place the fillet in a bag to prevent splashes flying in all directions, and beat back. Do this with all the breasts.
Season the chopped fillet with salt and pepper, wrap frozen butter in it and form cutlets.
Prepare the breading: beat lightly eggs, pour into different containers flour And breadcrumbs.
Cutlet roll in flour, dip in eggs And roll in breadcrumbs. To make the breading stronger, repeat the whole process again: flour, egg, breadcrumbs.
Remove formed cutlets into the freezer for 15-20 minutes.
Fry Chicken Kiev is necessary in large quantities of vegetable oil in a deep fryer or deep frying pan. You can fry it in the usual way, but it will take more time, and longer heating threatens to leak oil, which will turn our unusual cutlets into ordinary ones, and we don’t want that at all. So much fuss and fuss! Therefore, do not skimp on the oil and heat it well. In hot enough oil cutlets are fried for only 5-7 minutes. Turn the cutlet over while frying so that it browns on all sides.
Well, here is the result! Perfect: thin crispy breading, tender juicy meat and aromatic melted butter! Melted butter inside the cutlet is the highlight of the dish. Combining with the juice of chicken meat, it forms a delicious sauce. I just want to dip every bite of it!
You will need:
- chicken fillet 800 g (4 breasts)
- ground black pepper
- butter 100 gr
- egg 2 pcs
- flour 2 tbsp.
- breadcrumbs 1 cup
- vegetable oil for frying 0.5 l
Cut the chicken breast in half lengthwise without cutting all the way through.
Unwrap the fillet and pound it.
Salt, pepper and wrap a piece (25 g) of frozen butter in it.
Roll the formed cutlet in flour, dip in beaten eggs, and roll in breadcrumbs.
To make the breading stronger, repeat the process: flour, eggs, crackers.
Fry the cutlets in a large amount of hot vegetable oil for 5-7 minutes.
Turn over during frying so that the cutlet is browned on all sides.
Do you know how to cook classic Kyiv cutlets? Yes, those same juicy chicken cutlets, covered with a crispy crust, from which, when cut, a liquid yellow-transparent filling interspersed with aromatic greens beautifully flows out. Today, especially for you, a recipe with a photo of real Kiev-style cutlets, with bones, which are traditionally served not only in Ukrainian and Russian restaurants, but also in Europe and even in the USA.
Classic Kiev cutlets are made from beaten chicken fillet, inside of which there is butter with herbs (most often dill). Usually the product turns out to be quite impressive in size, and to make it more convenient to cut, the cooks came up with the idea of cutting the chicken so that the wing remains along with the breast. Traditionally, all the meat from the wing is trimmed, leaving only a neat bone that sticks out invitingly from the ruddy cutlet, which is convenient for holding the cutlet when slicing. Today I will tell you in detail how to “create such a miracle” from seemingly the simplest and most affordable products in a recipe with step-by-step photographs. Be sure to prepare it - I’m sure that your chicken Kiev will turn out exactly the same as in the restaurant!
Ingredients
- chicken breast with wing 2 pcs.
- butter 100 g
- fresh dill 10 g
- salt 0.5 tsp.
- a mixture of ground peppers 2-3 chips.
- loaf 200 g
- large eggs 2 pcs.
- wheat flour 2 tbsp. l.
- vegetable oil for deep frying
How to cook chicken Kiev
- First of all, you need to prepare the aroma oil, as it will need time to freeze. To do this, I combine soft butter, previously softened at room temperature, with finely chopped dill and mix thoroughly until smooth using a fork. You can add a little salt to it for taste.
 I wrap the “green” butter in cling film, forming something like candy. I pack a piece of loaf separately. And I place both pieces in the freezer so that they freeze slightly.
 In the meantime, I'm processing the chicken. You can buy a ready-made breast with a wing (as in my case) or cut up the chicken yourself - from one carcass you can cook 2 large Kiev cutlets. If you cut it yourself, first separate the breast along with the wings from the skeleton. Then cut it along the keel into two equal parts. Remove the skin and remove excess fat, if any.
 I cut off the outer phalanges of the wing, leaving only the bone adjacent directly to the breast itself. I cleaned the bone, that is, removed the skin and all the meat.
 Carefully cut off the inner prominent part of the breast - the so-called dewlap. The result was a large (with bone) and small fillet. In the place of thickening on a large, main piece of meat, I made a couple of cuts, but not completely, in order to open the fillet like a book. Salted and peppered.
 Covered the meat with cling film and beat it with a hammer. The main thing here is to make the fillet as thin as possible, but under no circumstances tear it!
 Meanwhile, the butter has already hardened. I divided it into 2 equal parts (according to the number of servings) and put it inside the beaten fillet. Covered the top with a dewlap.
 And I wrapped the ends so that the filling was inside (similar to a roll). If you carefully beat the meat, then there should be no problems. If, however, the structure does not look very reliable, you can fasten its ends with wooden toothpicks.
 I set the deep fryer to heat up - a saucepan with a large amount of vegetable oil (refined). I crushed a piece of loaf, which I froze at the beginning of the process, on a fine grater. Due to the fact that the bread was frozen well, it instantly turned into crumbs. Beat the eggs into a bowl, lightly salt them and scramble them with a fork (do not beat them!). As soon as the fryer was well heated, I coated the cutlets in the following sequence: flour, scrambled eggs, bread crumbs, and then again in scrambled eggs and crumbs.
 Immediately fry in boiling oil until golden brown, about 5-6 minutes. It’s better not to skimp on the oil or you’ll have to turn the product over to the other side, in which case be extremely careful not to get burned!
- Then I took it out of the fryer using a slotted spoon and transferred it to a baking dish. I sent the Kiev cutlets into the oven, preheated to 180 degrees for another 5-10 minutes, depending on the size, so that the meat had time to reach full readiness. They should be served immediately, hot.

Do you see the cut? If everything is done correctly, the oil will flow out beautifully from the cutlets, and they themselves will turn out very juicy and tender, with a loud crispy crust. The dish is best served with fresh vegetables and herbs. If desired, of course, you can add any side dish you like.


It's hard to imagine a person who doesn't like cutlets.
It's hard to imagine a person who doesn't like cutlets. They are often made from minced meat made from various types of meat, fish, poultry and even vegetables. But the classic chicken Kiev is prepared a little differently. At the very beginning of its appearance, it was prepared as follows. The chicken fillet was beaten with a hammer, and the butter was simply “beaten” into the meat during this process.
Simply, after the meat became thin, it was salted, peppered, and then greased with butter again. This gave the finished dish an extraordinary taste and tenderness. Of course, during its existence cutlet Kiev has undergone changes, and now housewives put a piece of butter in it. But the rest of the sequence remained almost the same.
The classic cooking recipe is as follows. The butter is wrapped in the beaten fillet, with a chicken bone also placed inside. This is done to make eating the cutlet convenient. Then, such a “chicken leg” is dipped in the egg mixture and rolled in breading. This cutlet is sent to the refrigerator, after which it is subjected to heat treatment in deep fat.
You should only eat this cutlet with your hands. But be careful! The meat is very juicy, so don't burn yourself.

Chicken Kiev: recipes
Of course, now there are many recipes for cooking Chicken Kiev. Each recipe has its own subtleties and highlights. If you wish, you can add various fillings to the fillet in addition to butter.
“Original Kiev cutlets”
To prepare “Original Chicken Kiev” you will need:
- 1 PC. skinless chicken breast
- 100 g butter
- 1 PC. egg
- 100 g white bread crumbs
- 50 g parsley
- 1\3 tsp. salt
- 1\4 tsp. freshly ground black pepper
- 100 g vegetable oil

Recipe for “Original Kiev cutlets”
- Before you decide to cook this dish, make sure that you have two bones from the legs or wings of the chicken.
- Now start preparing the dish. Wash the chicken breast. Carefully cut the fillet in half and make slits. You need to get a large layer. It needs to be placed on cling film, covering it on top. This is necessary so that the juice does not come out of the meat and does not splash everything around.
- After this, carefully beat the fillet. Rub it with salt and sprinkle a little pepper. In the meantime, start preparing the filling. To do this, you first need to take the butter out of the refrigerator and let it melt a little.
- Wash and chop the parsley. Mix it thoroughly with oil. After obtaining a homogeneous mass, use a spoon to form small, even patties. Place the resulting filling in the freezer for a few minutes.
- After it freezes, start forming the cutlets. To do this, beat the egg in a bowl, chop the crackers and place on a flat plate. Place pieces of butter and bones into the fillet and carefully “swaddle” them. Dip the resulting cutlets into the egg and then into the breadcrumbs.
- After this, repeat the breading process again. Place the resulting cutlets in heated vegetable oil and fry thoroughly.

"Kiev cutlets with mushrooms"
To prepare “Cutlets Kiev with mushrooms” you will need:
- 1 kg chicken breast
- 10 pieces. chicken eggs
- 20 g sour cream
- 400 g loaf
- 200 g butter
- 300 g mushrooms
- 1 PC. medium bulb
- 100 g dill or parsley
- 800 g vegetable oil

Recipe for “Kiev cutlet with mushrooms”
- First, start preparing the filling. Chop the mushrooms and onions and fry them together. Cut the butter into small cubes.
- Wash the greens thoroughly, dry and chop. Cut the breast into layers and beat well. Lightly salt the resulting plates.
- Place the mushroom mixture on them, a piece of butter and sprinkle with herbs. Then, carefully wrap the cutlets and place them in the freezer.
- Prepare the breading from the loaf, beat the eggs together with sour cream. Dip the cutlets in eggs and breadcrumbs, then fry.
Enjoy your meal!


We also recommend
 Chicken Kiev cutlets Making chicken Kiev cutlets
 Thin lavash in the oven How to make lavash in the oven detailed recipe
 Dishes for children made from cottage cheese Delicious dishes made from cottage cheese for children
 Cooking options and recommendations
 Cooking Italian biscotti and cantucci cookies
 Entrecote - step-by-step recipes for cooking pork, beef or lamb with photos