Kyiv cake according to the recipe of Alla Kovalchuk. Everything will be delicious. Kiev cake (01/08/2017) Kiev cake according to the recipe of Alla Kovalchuk
Kyiv cake INGREDIENTS Eggs - 12-13 pcs. Sugar - 800 g Second grade wheat flour - 100 g Cashew - 450 g Vanilla sugar - 30 g Butter (82.5%) - 400 g Milk (2.6%) - 350 ml Cocoa - 20 g Cognac - 20 ml METHOD PREPARATIONS Prepare the cake layers. You will need: eggs, sugar, flour, vanilla sugar and cashew nuts. Dry the nuts - fry in the oven at 150°C for 5-7 minutes until golden brown. Tip: shake the nuts every two minutes. We separate the whites from the yolks. For the cakes we use only proteins - they will give an airy and light structure to the cake. Place the yolks in the refrigerator, covered with cling film. Note: Only aged egg whites are used to make the crusts. To do this, the whites need to be left at room temperature overnight or passed through a sieve twice. Grind the toasted nuts with a rolling pin into coarse crumbs. Add 500 g of sugar and 3.5 tbsp to the nuts. flour and mix thoroughly. Using a mixer, beat the whites - first at low speed, and when foam forms - at higher speed. While beating, add 20 g of vanilla sugar. Beat the whites until thick and strong foam. Then mix the whites with the dry ingredients - so that the whites do not fall off, pour the mixture carefully and gradually. Stir with a spatula from bottom to top. We bake a cake. We use two identical baking pans - it is best to use springform round pans. Cover the bottom with parchment. Pour half the mixture into each mold - the mixture should tightly cover the entire bottom. During baking, the cake will double in size, so the layer thickness should be 1-1.5 cm. Place the molds in an oven preheated to 150°C. After 15-20 minutes, reduce the oven temperature to 120°C. Bake the cakes for an hour. Then we open the oven door, but leave the pans in the oven for another half hour - so that the cakes do not fall off due to a sharp temperature change. Prepare Charlotte cream. Stir 12 yolks and 300 g of sugar, and then add 350 ml of milk. Stir everything with a whisk until the yolks combine with the milk. Heat the milk mixture until thickened - so that the yolks are brewed: pour the mixture into a saucepan and keep on low heat, stirring constantly for 5-10 minutes until a uniform transparent yellow color. Remove the cream from the heat and pour into a separate bowl so that the cream does not continue to boil and does not separate. The bowl can be placed on ice to cool faster. Cool the cream to room temperature. Beat the butter with a mixer into a fluffy foam. Continuing to beat the butter, stir in the cooled cream base. Add 10 g of vanilla sugar and 1 tbsp to the cream. cognac Divide the Charlotte cream into 2 parts - larger and smaller. 2/3 of the cream (approximately 500-600 ml) will be used to coat the top and sides of the cake. Add 1 tablespoon of cocoa powder to it and mix. The second part of the cream - 200-300 ml - remains for the layer. We take the cakes out of the oven. They should double in size - become about 2 cm, take on a light beige color and become porous. Let them cool well at room temperature for at least 6 hours, preferably 10-12 hours. Assembling the cake. We take a wide flat plate, or better yet a cake pan. Place a spoonful of cream in the center. Place the cake on top, smooth side down. Place the Charlotte cream set aside for a layer on top. The thickness of the layer is the same as the cake layer - 2 cm. Place the second cake layer on top - bottom up. Lightly press the top of the cake. Using a wide, long knife or metal spatula, carefully coat the top and sides of the cake with the chocolate portion of the cream. We decorate the top of the cake with drawings from butter cream. For cream roses we use wide toothed nozzles. Apply the cream at two angles: 90° and 45°. Let the cream harden so that the cake holds its shape better - put the cake in the refrigerator for at least 30 minutes. Then sprinkle the cake with a thin layer of nuts.
Butter cream INGREDIENTS Butter (82.5%) - 200 g Powdered sugar - 100 g METHOD OF PREPARATION Beat all ingredients with a mixer until fluffy and thick cream.

Kiev cake is known and loved all over the world; it is the best souvenir that can be brought from the capital of Ukraine. It was invented completely by accident, in 1956, when confectioners forgot to put a batch of egg whites in the refrigerator for a sponge cake. To save the situation, factory workers topped the frozen cakes with buttercream and vanilla powder and decorated the cake with floral designs. This is how the progenitor of the Kyiv cake appeared. Later, nuts were added to it and the cream recipe was changed. How to make a classic Kyiv cake? You will find the recipe in our material. Kiev cake is a symbol of the capital of Ukraine, find out how to prepare it at home.
- Ingredients:
- eggs - 12-13 pcs.
- sugar - 800 g
- second grade wheat flour - 100 g
- cashews – 450 g
- vanilla sugar - 30 g
- butter (82.5%) - 400 g
- milk (2.6%) – 350 ml
- cocoa - 20 g
cognac – 20 ml
Cooking method:
- First of all, prepare the cake layers:
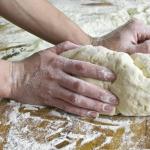
- You will need: eggs, sugar, flour, vanilla sugar and cashew nuts. The nuts need to be dried - roasted in the oven at 150 C for 5-7 minutes until golden brown.
- While the nuts are roasting, separate the whites from the yolks. Only whites are used for the cakes. They will create the airy and light structure of the cake. Combine all the whites and all the yolks in two different bowls. The whites are needed for the cakes, and the Charlotte cream is made from the yolks. But for now, put the yolks in the refrigerator, covered with cling film. . To make the cakes airy and crispy, you need to pass the whites through a sieve twice.
- Remove the nuts from the oven and let them cool. The toasted nuts should be crushed into coarse crumbs with a rolling pin.
- Place the chopped nuts in a bowl and add 500 g of sugar.
- Add 3.5 tbsp. flour to nuts with sugar and mix thoroughly with a tablespoon.
- We begin to beat the whites with a mixer at low speed 1-2, when foam forms, increase the speed to 4.
- During the beating process, add 20 g of vanilla sugar. You need to beat the whites until thick and strong foam.
- Mix egg whites with dry ingredients. But so that the whites do not fall off, pour the mixture carefully and gradually - by tablespoons. It is best to stir with a silicone spatula from bottom to top.
- Prepare two identical baking dishes. It is most convenient to use detachable round molds.
- Cover the bottom with parchment. Pour half the mixture into each mold.
- The mass is thick and should tightly cover the entire bottom. During baking, the cake will double in size, so the layer thickness should be 1-1.5 cm.
- The cake is kept in the oven for 1-1.5 hours at a low temperature - only 120C. But for the cakes to rise, they need hot air. Therefore, first place the cakes in a well-heated oven at 150C for 15-20 minutes, and then reduce the temperature.
- After the cakes have baked in the oven for an hour, turn off the heat and open the oven door. But you can’t take out the cakes right away - they will fall off due to a sharp temperature change. Leave the molds with the cakes to stand inside for another half hour.
While the cakes are in the oven, prepare the Charlotte cream:
- First, thoroughly stir 12 yolks and 300 g of sugar, and then pour in 350 ml of milk. Stir everything with a whisk until the yolks combine with the milk.
- This milk mixture needs to be heated to thicken - so that the yolks are cooked. Pour it into a saucepan and keep it over low heat and stir constantly for 5-10 minutes until it has a uniform transparent yellow color.
- Remove from heat and pour into a separate bowl to prevent the cream from separating. Place the bowl on ice to help the cream cool faster. Cool the cream to room temperature.
- Beat the butter with a mixer into a fluffy foam. Continue beating the butter and stir in the cooled cream base. .
- Add 10 g vanilla sugar and 1 tbsp. cognac in cream.
- You need to divide the Charlotte cream into 2 parts. The main mass - 2/3 (approximately 500-600 ml) - will be used to coat the top and sides of the cake. And the remaining 200-300 ml is for decoration.
- Add 1 tablespoon of cocoa powder to the reserved cream and mix again. This cream will go on the sides and top of the cake.
- Remove the cakes from the oven. In order for the cake to harden well, become truly airy and crispy, it must cool and firm up at room temperature for at least... 6 hours. And if time allows, all 10-12 hours.
- The cakes have doubled in size - they are about 2 cm. They are light beige, pleasant in color, not dense - porous.
Assembling the cake:
- Take a wide flat plate, or better yet, a cake pan. Place a spoonful of cream in its center. Place the crust inside, smooth side down. Place the reserved Charlotte cream on top. The thickness of the layer is the same as the cake layer - 2 cm. Place the second cake layer on top - bottom up. Lightly press the top of the cake.
- Now take the chocolate part of the cream. And carefully coat the top and sides of the cake with a wide, long knife or metal spatula.
- In order to decorate the top of the cake with different designs, you need to make a thick buttercream. For buttercream for decoration, take 200 g butter and 100 g of powdered sugar. Beat the butter with a mixer until smooth and gradually add powdered sugar.
- For cream roses, you need to put wide serrated tips on the bags. Let's put literally 1-1.5 tbsp in bags. cream. Like toothpaste, use your fingers to push it to the bottom. The cream is applied at two angles: 90° and 45°. Hold the bag or cornet perpendicular to the surface of the cake if you are drawing flowers, stars or other three-dimensional designs - this way they will turn out to be as tall and convex as possible. Place the bag perpendicularly, squeeze out the cream and with a sharp movement lift the bag up so that there are no tails left. The rose is ready!
- You can write on something or make a border around the edge by simply changing different piping bag tips.
- Kyiv cake is almost ready. But the cream needs to harden so that the cake holds its shape better. To do this, leave it in the refrigerator for at least 30 minutes. Remove the Kiev cake from the refrigerator and sprinkle with a thin layer of nuts.
Now your “Kyiv cake” is ready!
Video: Kyiv cake: classic recipe
How to make a classic Kyiv cake? You will find the recipe in our material. Kiev cake is a symbol of the capital of Ukraine, find out how to prepare it at homeOn November 29, Alla Kovalchuk, a professional culinary specialist, was visiting Nadezhda Matveeva and the “Everything Will Be Delicious” program. She invited the audience to prepare a masterpiece of confectionery art at home - “Kiev Cake”. For this you need the following products: for cakes - 12 egg whites, 350 g cashew nuts, 20 g vanilla sugar and 100 second grade flour (low gluten); for cream - 12 yolks, 350 ml milk, 400 g butter, one and a half glasses of sugar, vanilla sugar, 20 g cocoa.
So, let's get started... First, you need to dry the nuts - to do this, simply place them on a baking sheet and put them in the oven for a while. While the nuts are roasting, let's take care of the whites. In order for the cake to be airy and voluminous, the whites need to be “aged.” This can be done very simply - before whipping the whites, you need to pass them through a sieve. Leave the whites for a while and prepare the base of the cakes. The cooled cashew nuts need to be crushed into large crumbs - this can be done with a rolling pin. Next, add flour, vanilla sugar to the nuts and gradually add the whipped egg whites. Gently stir the mixture. So, the dough for baking the cakes is ready. Now divide the mixture into two parts and pour it into two identical molds, the bottom of which is lined with baking paper. The peculiarity of baking cakes for "Kyiv cake" is that they must first be baked at high temperature(150 degrees), and then you should reduce the oven temperature to 120 degrees. This will allow the cakes to quickly “set” and become airy and crispy.
Now let's make the cream. Place 12 egg yolks and one and a half cups of sugar in a bowl, whisk this mixture thoroughly with a whisk. Then add the milk and place the bowl with the cream on low heat, stirring constantly. Once the cream becomes thick, remove the pan from the heat and leave for the cream to cool. Meanwhile, beat the butter with a mixer - after whipping, its mass should double. Now mix both mixtures, adding the cooked cream to the butter.
Now mix both mixtures, adding the cooked cream to the butter. The finished cream should be divided into two parts - leave one (1/3 of the total cream) in its original form, and add cocoa to the other (2/3). White cream is intended for greasing the cake layers inside the cake, and the other part will be used to grease the top and sides of the cake. After baking the cakes, the oven door should be opened and the cakes should be left inside the oven for another hour, so that the cakes do not lose their airiness due to a sharp temperature change and gain strength. It is advisable that the cakes be coated with cream no earlier than six hours after baking - this will preserve all the properties of the cakes for the “Kyiv cake”.
How to make Kyiv cake - watch the video.
Legendary "Kyiv cake"- this is a real business card of Ukraine and Kyiv. And today in “” you will learn all the secrets of preparing this dessert at home. Original Kyiv cake recipe the cook will reveal Alla Kovalchu j. Guest of the episode - psychologist Natalya Kholodenko.
In today's episode “Everything will be delicious!” famous psychologist Natalya Kholodenko will learn how to cook “Kiev cake”. And her culinary mentor will be Alla Kovalchuk, a participant in the second season of MasterChef.
The famous “Kiev cake” has won many hearts. It has become a calling card not only of Kyiv, but of the whole of Ukraine. Every day, tens of thousands of guests of the Ukrainian capital, leaving Kyiv, take with them a sweet memory of the capital - “Kiev cake”.
But everyone knows that a dish prepared with your own hands is much tastier than one bought in a store. In fact, the recipe for “Kyiv cake” is much simpler than it seems at first glance. Therefore, today psychologist Natalya Kholodenko and Alla Kovalchuk will share with you the recipe for this famous cake so that you can please yourself and your loved ones with this dessert, prepared yourself at home.
Having tried it new recipe, Natalya admitted: “Today I prepared “Kiev cake” - the most delicious I have ever tasted. I advise you to prepare this cake according to our recipe, and the result will exceed all your expectations.”
Do you want to learn how to cook a real “Kiev cake”? Then learn with us.
Everything will be delicious. Broadcast from 11/29/14 Kyiv cake. Watch online
ALBTERNATIVE
Butter cream for “Kyiv cake”
Kiev cake is known and loved all over the world; it is the best souvenir that can be brought from the capital of Ukraine. It was invented completely by accident, in 1956, when confectioners forgot to put a batch of egg whites in the refrigerator for a sponge cake. To save the situation, factory workers topped the frozen cakes with buttercream and vanilla powder and decorated the cake with floral designs. This is how the progenitor of the Kyiv cake appeared. Later, nuts were added to it and the cream recipe was changed. How to make a classic Kyiv cake? You will find the recipe in our material. Kiev cake is a symbol of the capital of Ukraine, find out how to prepare it at home.
butter (82.5%) - 200 g
powdered sugar - 100 g
In order to decorate the top of the “Kiev cake” with different designs, you need to prepare a thick butter cream.
Method of preparation: Take 200 g of butter and 100 g of powdered sugar. Beat the butter with a mixer until smooth, gradually adding powdered sugar.
Now you can decorate your “Kiev cake” by adding an original inscription. To do this, use different attachments for a pastry bag.
"Kyiv cake"
Ingredients:
eggs - 12-13 pcs.
sugar - 800 g
second grade wheat flour - 100 g
cashews - 450 g
vanilla sugar - 30 g
butter (82.5%) - 400 g
milk (2.6%) - 350 ml
cocoa - 20 g
cognac - 20 ml
For decoration:
butter (82.5%) - 200g
powdered sugar-100g
Cooking method:
Let's start preparing the cake layers. You will need: eggs, sugar, flour, vanilla sugar and cashew nuts. The nuts need to be dried - roasted in the oven at 150 C for 5-7 minutes until golden brown.
You will need: eggs, sugar, flour, vanilla sugar and cashew nuts. The nuts need to be dried - roasted in the oven at 150 C for 5-7 minutes until golden brown.
To make the cakes airy and crispy, you need to pass the whites through a sieve twice. To prevent the protein from getting stuck, do not pour everything into the sieve at once - it is better in 3-4 servings. To make it faster, simply pour the whites from the bowl into the sieve. When there is almost no protein left at the bottom of the sieve, add the next portion and rub on top with a tablespoon.
Remove the nuts from the oven and let them cool. The toasted nuts should be crushed into coarse crumbs with a rolling pin.
Place 350 g of chopped nuts in a bowl and add 500 g of sugar. Add 3.5 tbsp. flour to nuts with sugar and mix thoroughly with a tablespoon.
We begin to beat the whites with a mixer at low speed 1-2, when foam forms, increase the speed to 4. During the whipping process, add 20 g of vanilla sugar. You need to beat the whites until thick and strong foam.
Mix egg whites with dry ingredients. But so that the whites do not fall off, pour the mixture carefully and gradually - by tablespoons. It is best to stir with a silicone spatula from bottom to top.
Prepare two identical baking dishes. It is most convenient to use detachable round molds. Cover the bottom with parchment. Pour half the mixture into each mold.
The mass is thick and should tightly cover the entire bottom. During baking, the cake will double in size, so the layer thickness should be 1-1.5 cm.
The cake is kept in the oven for 1-1.5 hours at a low temperature - only 120C. But for the cakes to rise, they need hot air. Therefore, first put the cakes in a well-heated oven - up to 150C - for 15-20 minutes, and then reduce the temperature. After the cakes have baked in the oven for an hour, turn off the heat and open the oven door. But you can’t take out the cakes right away - they will fall off due to a sharp temperature change. Leave the molds with the cakes to stand inside for another half hour.
While the cakes are in the oven, prepare the Charlotte cream. First, thoroughly stir 12 yolks and 300 g of sugar, and then pour in 350 ml of milk. Stir everything with a whisk until the yolks combine with the milk. This milk mixture needs to be heated to thicken - so that the yolks are cooked. Pour it into a saucepan and keep it over low heat and stir constantly for 5-10 minutes until it has a uniform transparent yellow color.
Remove from heat and pour into a separate bowl to prevent the cream from separating. Place the bowl on ice to help the cream cool faster. Cool the cream to room temperature.
Beat the butter with a mixer into a fluffy foam. Continue beating the butter and stir in the cooled cream base.
Add 10 g vanilla sugar and 1 tbsp. cognac in cream.
You need to divide the Charlotte cream into 2 parts. The main mass - 2/3 (approximately 500-600 ml) - will be used to coat the top and sides of the cake. And the remaining 200-300 ml is for the layer between the cakes. Add 1 tablespoon of cocoa powder to most of the reserved cream and mix again. This cream will go on the sides and top of the cake.
Remove the cakes from the oven. In order for the cake to harden well, become truly airy and crispy, it must cool and firm up at room temperature for at least... 6 hours. And if time allows, all 10-12 hours.
The cakes have doubled in size - they are about 2 cm. They are light beige, pleasant in color, not dense - porous.
Assembling the cake. Take a wide flat plate, or better yet, a cake pan. Place a spoonful of cream in its center. Place the crust inside, smooth side down. Place the reserved Charlotte cream on top. The thickness of the layer is the same as the cake layer - 2 cm. On top - place the second cake layer - bottom up. Lightly press the top of the cake. Now take the chocolate part of the cream. And carefully coat the top and sides of the cake with a wide, long knife or metal spatula.
In order to decorate the top of the cake with different designs, you need to make a thick buttercream. For buttercream for decoration, use 200 g butter and 100 g icing sugar. Beat the butter with a mixer until smooth and gradually add powdered sugar.
For cream roses, you need to put wide serrated tips on the bags. Let's put literally 1-1.5 tbsp in bags. cream. Like toothpaste, use your fingers to push it to the bottom. The cream is applied at two angles: 90° and 45°. Hold the bag or cornet perpendicular to the surface of the cake if you are drawing flowers, stars or other three-dimensional designs - this way they will turn out to be as tall and convex as possible. Place the bag perpendicularly, squeeze out the cream and with a sharp movement lift the bag up so that there are no tails left. The rose is ready!
Decorate the cake with roses. You can write on something or make a border around the edge by simply changing different piping bag tips.
Kyiv cake is almost ready. But the cream needs to harden so that the cake holds its shape better. To do this, leave it in the refrigerator for at least 30 minutes. Remove the Kiev cake from the refrigerator and sprinkle a thin layer of nuts on the sides. Now your “Kyiv cake” is ready!
Well-known psychologist and expert of the “Save Our Family” program Natalya Kholodenko will learn how to cook “Kiev cake”. And her culinary mentor will be Alla Kovalchuk, a participant in the second season of MasterChef.
The famous “Kiev cake” has won many hearts. It has become the calling card of not only Kiev, but the whole of Ukraine. Every day, tens of thousands of guests of the Ukrainian capital, leaving Kiev, take with them a sweet memory of the capital - “Kiev cake”
Kiev cake
Kiev cake is known and loved all over the world; it is the best souvenir that can be brought from the capital of Ukraine. It was invented completely by accident, in 1956, when confectioners forgot to put a batch of egg whites in the refrigerator for a sponge cake. To save the situation, factory workers topped the frozen cakes with buttercream and vanilla powder and decorated the cake with floral designs. This is how the progenitor of the Kyiv cake appeared. Later, nuts were added to it and the cream recipe was changed. How to make a classic Kyiv cake? You will find the recipe in our material. Kiev cake is a symbol of the capital of Ukraine, find out how to prepare it at home.
eggs - 12-13 pcs.
sugar - 800 g
second grade wheat flour - 100 g
cashews - 450 g
vanilla sugar - 30 g
butter (82.5%) - 400 g
milk (2.6%) - 350 ml
cocoa - 20 g
cognac - 20 ml
Cooking method:
Let's start preparing the cake layers. You will need: eggs, sugar, flour, vanilla sugar and cashew nuts. The nuts need to be dried - roasted in the oven at 150 C for 5-7 minutes until golden brown.
While the nuts are roasting, separate the whites from the yolks. Only whites are used for the cakes. They will create the airy and light structure of the cake. Combine all the whites and all the yolks in two different bowls. The whites are needed for the cakes, and the Charlotte cream is made from the yolks. But for now, put the yolks in the refrigerator, covered with cling film.
To make the cakes airy and crispy, you need to pass the whites through a sieve twice. To prevent the protein from getting stuck, do not pour everything into the sieve at once - it is better in 3-4 servings. To make it faster, simply pour the whites from the bowl into the sieve. When there is almost no protein left at the bottom of the sieve, add the next portion and rub on top with a tablespoon.
Remove the nuts from the oven and let them cool. The toasted nuts should be crushed into coarse crumbs with a rolling pin.
Place the chopped nuts in a bowl and add 500 g of sugar. Add 3.5 tbsp. flour to nuts with sugar and mix thoroughly with a tablespoon.
We begin to beat the whites with a mixer at low speed 1-2, when foam forms, increase the speed to 4. During the whipping process, add 20 g of vanilla sugar. You need to beat the whites until thick and strong foam.
Mix egg whites with dry ingredients. But to prevent the whites from falling off, pour in the mixture carefully and gradually - using tablespoons. It is best to stir with a silicone spatula from bottom to top.
Prepare two identical baking dishes. It is most convenient to use detachable round molds. Cover the bottom with parchment. Pour half the mixture into each mold.
Place the whipped whites in a baking dish.
The mass is thick and should tightly cover the entire bottom. During baking, the cake will double in size, so the layer thickness should be 1-1.5 cm.
The cake is kept in the oven for 1-1.5 hours at a low temperature - only 120C. But for the cakes to rise, they need hot air. Therefore, first place the cakes in a well-heated oven at 150C for 15-20 minutes, and then reduce the temperature. After the cakes have baked in the oven for an hour, turn off the heat and open the oven door. But you can’t take out the cakes right away - they will fall off due to a sharp temperature change. Leave the molds with the cakes to stand inside for another half hour.
While the cakes are in the oven, prepare the Charlotte cream. First, thoroughly stir 12 yolks and 300 g of sugar, and then pour in 350 ml of milk. Stir everything with a whisk until the yolks combine with the milk. This milk mixture needs to be heated to thicken - so that the yolks are cooked. Pour it into a saucepan and keep it over low heat and stir constantly for 5-10 minutes until it has a uniform transparent yellow color.
Remove from heat and pour into a separate bowl so that the cream does not separate. Place the bowl on ice to help the cream cool faster. Cool the cream to room temperature.
Beat the butter with a mixer into a fluffy foam. Continue beating the butter and stir in the cooled cream base.
Add 10 g vanilla sugar and 1 tbsp. cognac in cream.
You need to divide the Charlotte cream into 2 parts. The main mass - 2/3 (approximately 500-600 ml) - will be used to coat the cake on top and sides. And the remaining 200-300 ml is for decoration. Add 1 tablespoon of cocoa powder to the reserved cream and mix again. This cream will go on the sides and top of the cake.
Remove the cakes from the oven. In order for the cake to harden well, become truly airy and crispy, it must cool and firm up at room temperature for at least... 6 hours. And if time allows, all 10-12 hours.
The cakes have doubled in size - they are about 2 cm. They are light beige, pleasant in color, not dense - porous.
Assembling the cake. Take a wide flat plate, or better yet a cake pan. Place a spoonful of cream in its center. Place the crust inside, smooth side down. Place the Charlotte cream set aside for a layer on top. The thickness of the layer is the same as the cake layer - 2 cm. On top - place the second cake layer - bottom up. Lightly press the top of the cake. Now take the chocolate part of the cream. And carefully coat the top and sides of the cake with a wide, long knife or metal spatula.
In order to decorate the top of the cake with different designs, you need to make a thick buttercream. For buttercream for decoration, use 200 g butter and 100 g icing sugar. Beat the butter with a mixer until smooth and gradually add powdered sugar.
For cream roses, you need to put wide serrated tips on the bags. We will literally put 1-1.5 tbsp into the bags. cream. Like toothpaste, use your fingers to push it to the bottom. The cream is applied at two angles: 90° and 45°. Hold the bag or cornet perpendicular to the surface of the cake if you are drawing flowers, stars or other three-dimensional designs - this way they will turn out to be as tall and convex as possible. Place the bag perpendicularly, squeeze out the cream and with a sharp movement lift the bag up so that there are no tails left. The rose is ready!
Decorate the cake with roses.
You can write on something or make a border around the edge by simply changing different piping bag attachments.
Kiev cake is almost ready. But the cream needs to harden so that the cake holds its shape better. To do this, leave it in the refrigerator for at least 30 minutes. Remove the Kiev cake from the refrigerator and sprinkle with a thin layer of nuts. Now your “Kiev cake” is ready!
Butter cream for Kiev cake
Kiev cake is known and loved all over the world; it is the best souvenir that can be brought from the capital of Ukraine. It was invented completely by accident, in 1956, when confectioners forgot to put a batch of egg whites in the refrigerator for a sponge cake. To save the situation, factory workers topped the frozen cakes with buttercream and vanilla powder and decorated the cake with floral designs. This is how the progenitor of the Kyiv cake appeared. Later, nuts were added to it and the cream recipe was changed. How to make a classic Kyiv cake? You will find the recipe in our material. Kiev cake is a symbol of the capital of Ukraine, find out how to prepare it at home.
butter (82.5%) - 200 g
powdered sugar - 100 g
Cooking method:
Take 200 g of butter and 100 g of powdered sugar. Beat the butter with a mixer until smooth, gradually adding powdered sugar.
Now you can decorate your “Kiev cake” by adding an original inscription. To do this, use different attachments for a pastry bag.
We also recommend
 Country pizza with cottage cheese and herbs
 Banana and egg pancakes with flour
 Lazy khachapuri - the most delicious recipes with different cheese fillings Khachapuri with lavash cheese
 Eggplant appetizer for the winter “Ogonyok”
 Pickled apples for the winter Pickled apples with mustard a simple recipe
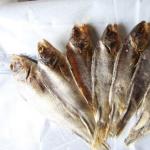 Flounder: salting in small-scale quantities using an artisanal method. A way to revive dried flounder at home.